Chapter II. Some Nuts and Bolts of Network Drafting
I. Some Threadings on the 4-End Initial
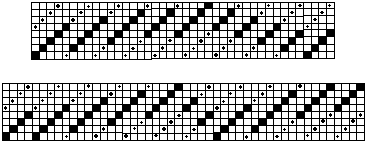
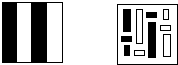
The 4-end initial on 8 shafts will be used in this chapter. The asymmetrical threadings in figure 1A can be used for either single or double layer weaves. The threading in I B can be used for a single layer weave but not for double weave while the threading in I C can be used for double weave but not for single weave.
Figure 1. 4-End Initial on 8 Shafts
A. Two Asymmetrical Threadings
B. A Symmetrical Threading

C. Another Symmetrical Threading

The network in figure I B can be used for any single layer weave that can be woven on the 4-end initial because threads always alternate on odd and even number shafts. In the most common form of double weave, threads on odd numbered shafts are in one cloth layer and the threads on even number shafts will be in the other cloth layer. This means that at the turning point in figure I B two threads on shaft 8 will always weave together in one of the cloth layers of double weave. A way to avoid that problem is to use the network shown in figure I C.
A great variety of threadings can be derived. I find it helpful to develop a threading on the network by looking at groups of 4 threads. For example, figure 2 shows how the threading of figure I C can be expanded to bring out the 4 thread groupings.. The first and last are often labeled as block A and block B for traditional 8 shaft double weave. The middle three can be considered transition blocks (they become important in weaving 4 or 8 blocks of double weave with an 8-shaft loom).
Figure 2. 4 Thread Groupings
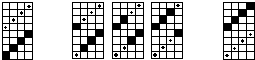
The real advantage in looking at threading in this fashion is that new or expanded threadings are so easy to derive. These four thread groups can be repeated or deleted or rearranged at will because the threading will always fall on the network. Examples of this will be presented in Chapters III and IV.
II. Threading, Tieup, Peg Plan and Treadling
A. For Non-Symmetrical Designs
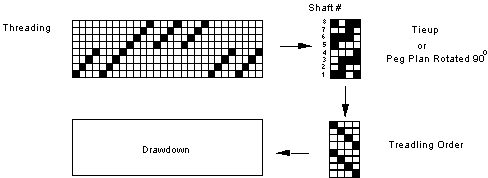
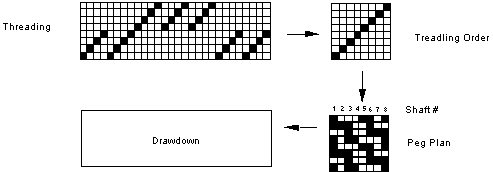
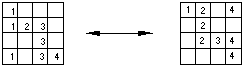
All floor loom weavers soon become familiar with the format for making a drawdown: from the threading to the tieup to the treadling order to the drawdown. Figure 4 gives an example (without the actual drawdown!) which could be used with a treadle loom, a table loom, or a dobby loom.
Figure 3. Scheme Leading to the Drawdown
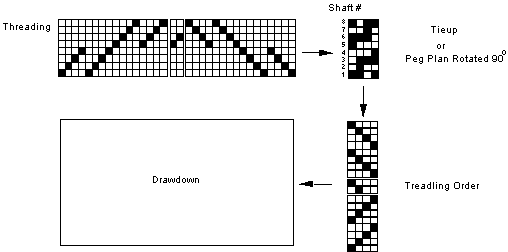
A dobby loom can be set up in a slightly different way which is shown next. This is sometimes referred to as "single ties to multiple treadles".
Figure 4. An Alternate Scheme Leading to the Drawdown
B. For Symmetrical Designs
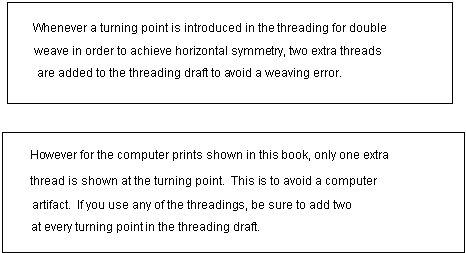
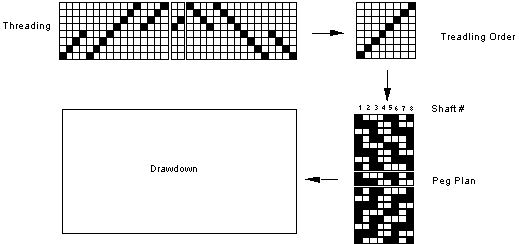
It is quite straightforward to make designs symmetical in the horizontal direction (through changes in the threading) or in the vertical direction (through changes in the treadling order or in the peg plan). Figure 4 repeats the information in figure 3 to show how symmetry can be achieved. For double weave note that it is necessary to have two extra threads so that errors do not occur in either the top or the bottom cloth layers. Similarly two extra treadlings or peg plans are required for the same reason. The extra threads and treadlings or peg plans have been separated to let you see more easily what happens before each of these is reversed to achieve symmetry.
Figure 5. Symmetrical Schemes leading to the Drawdowns
RULE. Remember two extra warp threads are needed at the turning point for horizontal symmetry and two extra treadlings or peg plans are needed at the turning point for vertical symmetry.
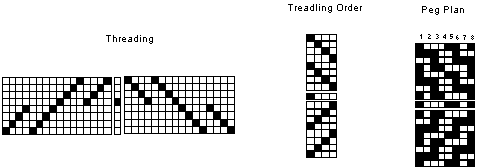
So having said that I want to alert you to the fact that all of the computer printouts where symmetrical designs are given do not follow that rule. Sorry. The reason is that the weave programs I have been using with my MacIntosh computer do not have the capability to show the two sides of a double woven fabric. Figure 6 shows examples of the threading, treadling and peg plan format used for the computer printouts. REMEMBER to carry out the weaving in the manner of figure 5, not figure 6.
Figure 6. The Formats for the Computer Printouts
Further explanation is presented in Appendix C. But as my computer son says, this is "`geek stuff".
III. Transitions between Peg Plans
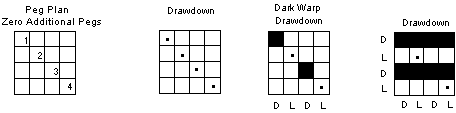
A basic element in network drafting is the transition that occurs from one weave structure to another weave structure. The pattern line provides a very efficient way to derive the threading and the peg plan for this transition. I would like to present another method that looks at the peg plan in a more general manner. In double weave there are six different peg plans giving different combinations of the four warp threads in the two layers. The discussion here is limited to Peg Plan I (dark top layer, light bottom layer) and Peg Plan II (light top layer, dark bottom layer). The transition between the two peg plans is given in figure 7. The numbers used in the peg plans are for shafts 1-4 but of course the diagrams are applicable to other shafts.
Figure 7. Transition between Peg Plan I and Peg Plan II
There are several things in these two diagrams that are identical. First, some numbers always appear in the same place which means that there is always a peg in that square. Second, four empty spaces always appear in the same place which means there is never a peg in that position. In figure 8, a zero, 0, indicates a square where a peg never appears.
Figure 8. Common Features of the Two Basic Peg Plans

That leaves eight squares in Figure 8 where a peg may or may not go. "To peg or not to peg" are the choices. Two choices for each empty space lead to a total of
2 x 2 x 2 x 2 x 2 x 2 x 2 x 2 = 256
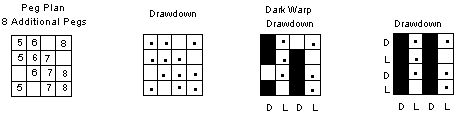
different peg plans for double weave. These peg plans are given in Appendix A-1 with their drawdowns and A-2 with their drawups.. Let me show the drawdowns for two of the 256 peg plans, the first where no additional pegs are added to figure 8 and the second where eight additional pegs have been added. The procedure I use for drawdowns is presented in figure 9. The peg plan comes first and next a diagram where dots replace the numbers. The third diagram is a warp drawdown for the dark warp threads (a jack loom with rising shed is assumed). In the final square, dark weft threads complete the drawdown. (An empty square indicates a light weft thread in the top layer and a square with a black dot stands for a light warp thread also in the top layer.)
Figure 9. From Peg Plan to Drawdown in Four Steps
The finished weaving looks like the first of the next two diagrams when the grid lines and dots are erased. The second diagram shows the weave structure with the DLDL color order for both the warp and the weft.
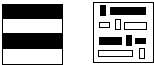
The appearance of the weaving and the weave structure are shown next.
For two of the 256 peg plans, peg plans I and II, there will be the two cloth layers of traditional double weave. Half of the warp and weft threads are in one cloth layer and the other half are in the second cloth layer. Because of this the sett that is recommended for traditional double weave is twice the sett for single layer plain weave.
For the remaining 254 peg plans, there will be a single cloth layer in integrated double weave. All warp and weft threads are in the same cloth layer and the sett should revert to the one proper for single layer plain weave, that is half the sett appropriate for two layer double weave.
So what should be the sett for a weaving that has some areas in traditional double weave and other areas in integrated double weave? If the sett is proper for the two layer sections, then twice as many threads are crowded into the integrated double weave section. On the other hand if the sett is proper for the single layer areas, then the two-layer region will probably be much too loose. Well there is no one answer except to try different setts and choose the one you like. I find that a sett that is about 10 - 20 % more open than the sett used for traditional double weave seems about right.
IV. Another Look at the 254 Peg Plans
The drawdowns in Appendix A-1 are all one unit on a side. More revealing are drawdowns of two units on a side and these are given in Appendix B-1. Notice that there are far fewer than 254 distinct designs and they have been grouped in Appendix B-1 to emphasize this. Some are shifted up or down by a few threads. Others are the positive-negative images of each other. In figure 10 the drawdowns and weave structures for the tieups numbered 4-36 and 4-63 are shown. The drawdowns come from Appendix A-1 and the 4 unit drawing from Appendix B-1.
Figure 10. The Drawdowns and Weave Structures for Two of the 254 Peg Plans
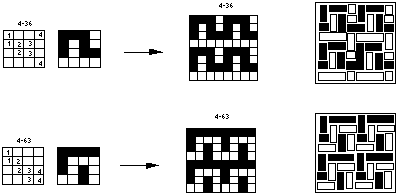
The designs in single unit size seem to be quite different. However the four unit drawdowns begin to reveal their similarity. In the example used here, the designs are the positive-negative versions of each other. Also the design of 4-63 has been shifted by one thread in both the vertical and horizontal directions from the design in 4-36.The weave structure diagrams in figure 9 and 10 show that the warp and weft threads interlock so that none of the threads can slide under other threads, two more examples of integrated double weave, single layer weaves that show all the warp and weft threads. That this is not always true is explained in Appendix D where the problem of drawdown for double weave is developed more extensively.