Network Drafting for Double Weave
Introduction
At Convergence 1992 in Washington D.C. Alice Schlein and I both presented seminars. I had just published my book "Loom Controlled Double Weave" and thought that I understood double weave rather well. That is, until I heard Alice’s presentation on network drafting! Among her many beautiful and mysterious samples was a group in double weave and I realized there was still a fair amount about double weave that I needed to ponder.
That started me on a rather lengthy program of trying to "get a handle on" what happens when the principles of network drafting are applied to double weave. Along the way I wandered down some different paths for a while (four double weave blocks with an 8 shaft loom; eight double weave blocks with an 8 shaft loom; dividing and recombining the two basic tieups of double weave which leads to integrated double weave) and it is only now that I see how those different paths interrelate with network drafting. Alice Schlein’s book "Network Drafting: an Introduction" published in 1994, along with her articles in Weaver’s magazine, provided both an inspiration and a challenge for me. I urge any weaver interested in network drafting to read her book. In the discussion that follows, I make use, with permission, of several examples that Alice has presented.
Chapter I. A Voyage of Discovery
For many years I lived very happily in a "Lotus Land of Double Weave" where four shafts are needed for each double weave block, where all designs are nicely rectilinear, and where the warp and the weft threads move from one layer of double weave to another layer and back again. Rather suddenly I became aware that there are other "Double Weave Lands" to be explored where the design may have curved forms with fuzzy edges and where all the threads of a double weave are in a single cloth layer! I embarked on a rather long voyage of discovery, sometimes over dark and mysterious waters, sometimes foundering on the shoals of "Network Drafting for Single Layer Weaves" before I landed safely. This chapter describes some aspects of that voyage culminating in the day that I found my own Rosetta Stone to unlock the mysteries of network drafting. So join me on the voyage. But first some background on network drafting for a single layer weave.
I. Network Drafting for a Single Layer Weave
A. Initials and Networks.
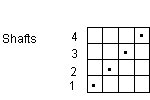
The smallest amount of information necessary to determine the threading for a weave structure is called its "initial". The initial in figure 1 applies for a number of weave structures including plain weave, basket weave, many 4 shaft twill weaves, and double weave.
Figure 1. The 4-End Initial
An initial is used to build up a network which may be right or left handed and can also be a combination of directions. The 4-end network can be extended to any number of shafts that is a multiple of 4. Examples are shown in Figures 2 and 3.
Figure 2. Three Networks on 4 Shafts

A Symmetrical Network
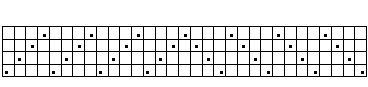
Figure 3. A Network on 8 Shafts Based on the 4-End Initial
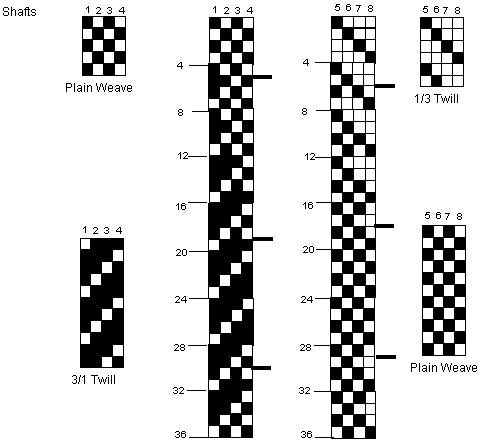
As long as the threading draft chosen for the weaving "falls" on the network made from the 4-end initial, any four shaft weave structure can be woven with that draft. For example, here is a threading draft for an 8-shaft loom that I will use to illustrate a number of points about network drafting. Three different peg plans are shown on the left: for plain weave, for 1/3 twill and for 3/1 twill. The drawdowns for the three peg plans are presented. (The important thing to recognize is that the drawdown will show the appropriate weave structure throughout because the threading falls on the network).
Figure 4. A Threading on the Network and Three Peg Plans
Let’s try another threading, an advancing twill. Notice however that this threading sometimes falls on the 4-end initial and sometimes does not. Now when the drawdown is made, pure weave structures are not woven. In both these diagrams, the warp is dark and the weft is light.
Figure 5. A Threading Not on the Network and Three Peg Plans
* Small squares define the network. Filled squares show the threading.
B. Drawdowns
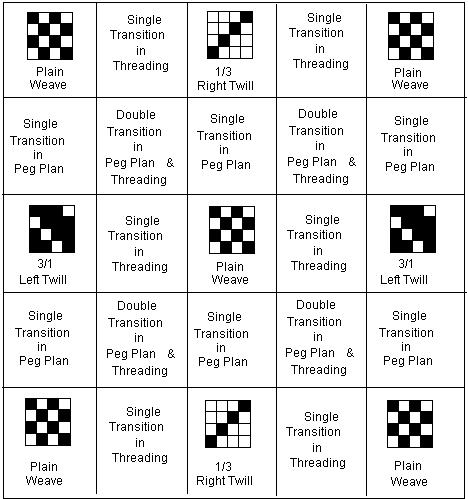
Figure 6 illustrates what can be achieved when the rules of network drafting are followed. A pattern line placed on the network leads to a threading draft. Then, when "cut and paste" treatment of three different types of peg plans is carried out, a final peg plan containing aspects of the three different weave structures results. This diagram, from page 10 of Alice Schlein’s book "Network Drafting: An Introduction", proved to be the Rosetta Stone for me, unlocking the mysteries of network drafting.
Figure 6. An Example of a Design Based on Network Drafting Principles
C. Dissecting the Threading
The first 32 threads in the threading draft look like this. They have been separated into two groups. The top diagram shows the threading for shafts 5-8 and the lower diagram the threading for shafts 1-4. The vertical bars mark the neighboring threads 1-7 that belong to block A (threads on shafts 1-4) and the neighboring threads 18-27 that belong to block B (threads on shafts 5-8).
Figure 7. The Threading Diagram Dissected
Threads 8-17 and 29-32 don’t belong to a specific block and I like to think of them as transition threads.
D. Dissecting the Peg Plan.
The same idea can be applied to the peg plan. In order to see this more easily, the peg plan is divided, one for shafts 1-4 and the other for shafts 5-8. Now the horizontal bars show regions where the peg plan identifies a specific weave structure (plain weave, 1-3 twill, or 3-1 twill). Those regions have been pulled out to the right or left so they are easy to identify.
The peg plans numbered 6-19 and 31-36 on shafts 1-4 and the peg plans numbered 7-18 and 30-36 on shafts 5-8 can be considered to be transition peg plans.
Figure 8. The Peg Plan Dissected
Perhaps there is an easier way to see the total picture. So let’s go back to the full design. But now only those threading regions that belong to either block A or B are shown. In addition only those peg plans that belong exclusively to shafts 1-4 or shafts 5-8 are indicated. When the drawdown is made, there are isolated islands where the three different weave structures appear. Here is that drawdown. Remember that this works because all of the threads fall on the network.
It is worthwhile to compare figures 6 and 9.
Figure 9. Partial Drawdown Showing Regions of Pure Weave Structures

But how about the white areas in this diagram? I began to see them as transition regions because the threading did not fall within either block A or block B, or because the pegging plans did not belong either to shafts 1-4 or shafts 5-8, or because of both of these. I finally had the answer I was searching for, namely, what happens in network drafting. These ideas can be presented schematically.
Figure 10. Schematic Diagram to Show Islands of a Single Weave Structure
And Regions of Transition Weave Structures
Shafts 1-4 Shafts 5-8 Shafts 1-4
II. Network Drafting for Double Weave.
The ideas expressed in figure 10 should apply just as well in double weave as in single weave. One schematic diagram looks like this.
Figure 11. Schematic Diagram for Network Drafting for Double Weave
Shafts 1-4 Shafts 5-8 Shafts 1-4 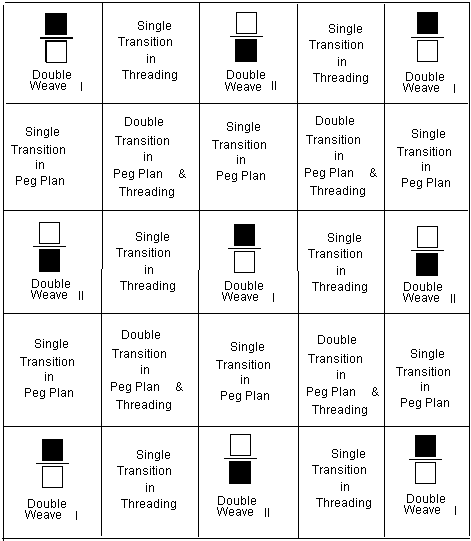
The two basic peg plans for double weave that I have called Double Weave I and Double Weave II have the forms shown here. Both produce two cloth layers, traditional double weave.
When the weft color order is also DLDL, the first of these peg plans produces a dark top layer and a light bottom layer while the second gives the opposite effect, light on top and dark on the bottom.

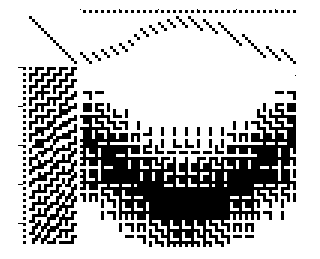
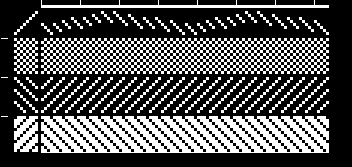
Here is an example that Alice Schlein presents in her article on page 54, Weaver’s Magazine Issue 33, Fall 1996. The drawdown is slightly modified to show the dark and light threads in the top layer of double weave.
Figure 12. Waves # 1
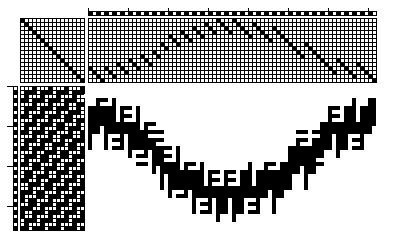
Well so far, so good. There definitely seem to be regions that are all light or all dark with transition regions along the edges of those regions. My hypothesis is holding together. Let’s check things out in a bit more detail by examining the peg plans for Waves # 1.
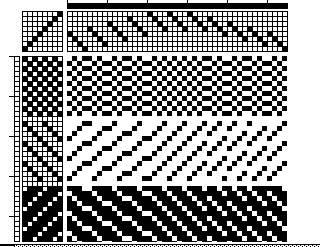
A. Peg Plans for Waves # 1, Testing the Hypothesis!
I expected to find Peg Plan I and Peg Plan II somewhere in each column to provide for the areas that are light or dark in the top layer, along with a number of peg plans that create the transition regions. Here are the four columns of pegging presented separately so they are easier to examine. In addition the pegging is grouped in sets of four.
Figure 13. Analysis of Peg Plan for Waves # 1
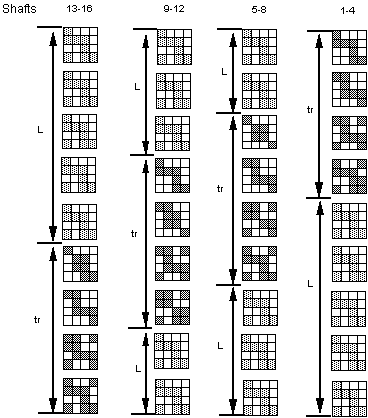
Certain things look pretty good. There are regions where the light layer of traditional double weave appears and there are regions where the transitional motifs of integrated double weave will show up.
BUT!
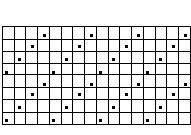
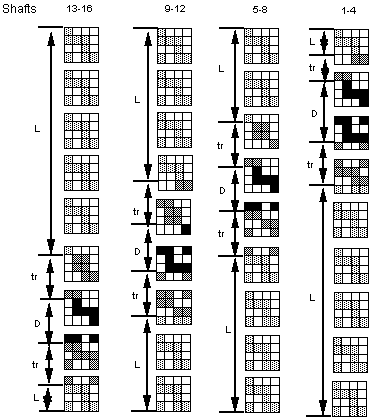
Where are the sections with the dark layer of traditional double weave? Both the picture in Weaver’s magazine and the computer printout indicate that there should be a meandering line of black. So someplace in each column there should be peg plan II to indicate where the dark layer of traditional double weave will be in the overall weaving. Careful checking failed to find peg plan II in the overall peg plan. There is of course the possibility that I had overlooked something. I pondered the situation for several days and suddenly the answer popped into my mind one night as I was going to sleep. It seems that I had returned to Lotus Land where the peg plans are always in groups of four!
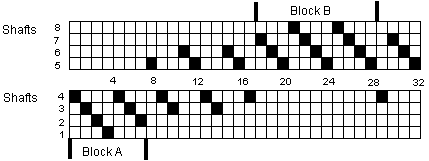
Sure enough! I looked down each column to see if the four lines of peg plan II showed up but not necessarily in a well ordered group of four. Lo and behold, there they were hidden in the transition sections. The next diagram shows the new analysis.
Figure 14. New Analysis of Peg Plan for Waves # 1
Voila and eureka!
The dark peg plans show up in three different ways. This was an important message for me. Peg plans are not limited just to groups of four nor do they have to appear always in a certain order.
B. What Lies Ahead?
Before embarking on a more general discussion of network drafting for double weave in the next chapter, I want to give one example of how a network drafting design may be extended. The transition regions in the peg plans in many examples of network drafting are relatively
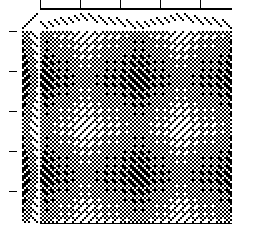
short so why not extend them. I repeat the drawdown for Waves # 1 in figure 15 and then show how it can be modified by lengthening the transition pegging sections.
Figure 15. Original Drawdown for Waves # 1
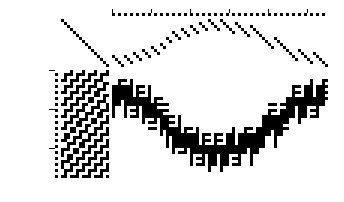
Figure 16. Drawdown for Waves # 1 with Additional Transition Pegging Sections