Taking the Mystery out of Double Weave Tieups (I Hope)
Page A
It is not easy to understand and remember how to figure out the tieups for double weave. Here is the method I use shown step by step and one weaving block at a time.
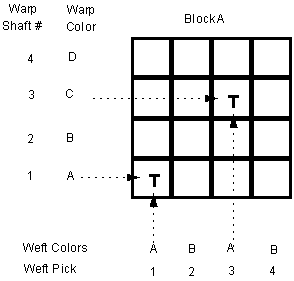
1. Draw a 4 x 4 grid and label it block A with warp shaft numbers and warp colors on the left of the grid. I have chosen four colors A,B,C, and D for the warp. You may find it easier to use colors such as R for red, O for orange, and so on. Label weft pick numbers and weft colors across the bottom of the grid. I have arbitrarily chosen two of the warp colors A and B for the weft colors. Other colors could of course be chosen. The weft order is always the same. ABAB. (Why? Then in multiblock weaving, the weft will weave properly in all blocks no matter how many tieup changes you decide to make.)
2a. Choose the color scheme you want for the warp and identify the shaft numbers and colors for the top layer and for the bottom layer.
2b. Choose the color scheme you want for the weft and identify the weft pick numbers and the weft colors for the top layer and for the bottom layer.
(These are choices that you the weaver can make.)
Shaft #’s Colors
For the warp Top Layer 13 AC
Bottom Layer 24 BD
Pick #’s Colors
For the weft Top Layer 13 AA
Bottom Layer 24 BB
Page B
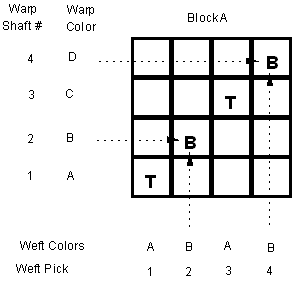
3. Identify the two warp threads that you want to weave in the top layer by shaft number, by warp color, and by the order in which they weave. In this example the warp threads are on shafts 1 and 3, their colors are A and C respectively, and they weave in the order that the threads on shaft 1 are to be raised for the first weft pick and the threads on shaft 3 are to be raised for the third weft pick. Draw horizontal arrows from the proper warp threads into the grid. Draw vertical arrows from the proper weft pick into the grids. Where they meet, T is written in that grid square to signify that these will be the two warp threads weaving in the top layer of the double weave. Here is what that looks like.
Completion of the grid follows almost automatically once the T’;s have been put in place. Let us continue step by step.
4. Identify the two warp threads that you want to weave in the bottom layer by shaft number, by warp color and by the order in which they weave. In this example the warp threads are on shafts 2 and 4, their colors are B and D, and they weave in the order that threads on shaft 2 are raised for the second weft pick the threads on shaft 4 are raised for the fourth weft pick. Draw the horizontal and vertival arrows again. Where they meet, write in B’s to signify these warp threads will be in the bottom layer of the double weave.
Page C
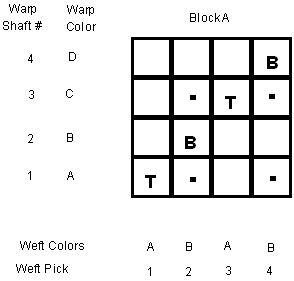
5. We are almost done. In order to weave the bottom layer of double weave, the top layer must be raised out of the way. This is shown in the next diagram with black dots to represent the shafts of the top layer which must be raised so that the second and fourth weft picks can weave the bottom layer. Notice that the black dots always appear in the rows with T’s and in the columns with B’s. The tieup grid for block A has been completed!
Page D
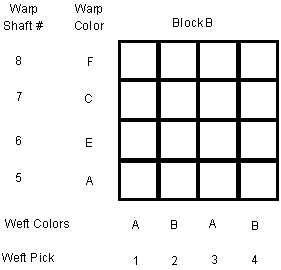
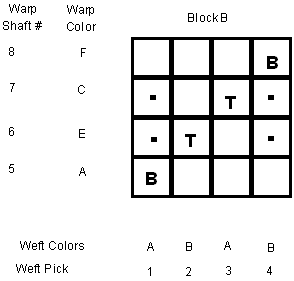
Let’s go through the same procedure for block B where the threads are on shafts 5-8.
The warp colors have been changed. The weft pick #’s and colors stay the same because blocks A and B are to be woven at the same time.
I have deliberately chosen to make the plan for block B different from the plan used in block A. Here it is. The colors for the warp and the weft in the two layers has changed. (That was my choice.)
Shaft #’s Colors
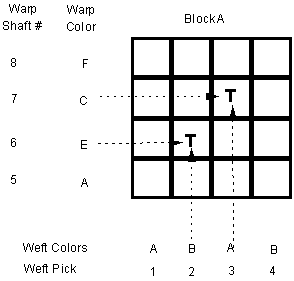
For the warp Top Layer 67 EC
Bottom Layer 58 AF
Pick #’s Colors
For the weft Top Layer 23 BA
Bottom Layer 14 AB
The arrows for the top layer are shown and the T’s are inserted followed by the diagrams where the B’s and the dots are added, leading to the complete tieup for block B.
Page E

Page F
Addition of the black dots gives the final tieup for block B.
________________________________________________________
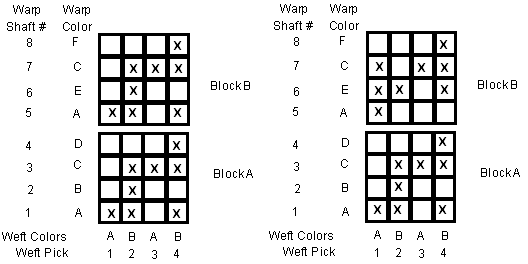
Now we are ready to present the tieups for both blocks A and B, one above the other as is the usual presentation. I have also changed the T’s, B’s, and black dots to X’s which is also the customary notation for tieup diagrams.
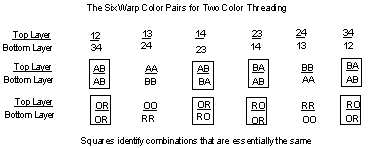
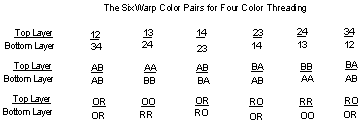
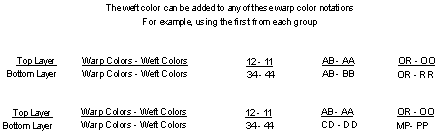
The first of the two tieups weaves the background of the window design. The tieups for shafts 1-4 and for shafts 5-8 are identical in form. The second of the two tieups weaves the pattern or window of the window design and here of course the tieup for block B is different in form from the tieup for block A.
Page G
Tieup for Background Tieup for Window
_______________________________________________________________
.
Some Additional Notes about Notations, Numbers and Colors
Page H