
This post is intended for several audiences. It’s a checklist for me when I want to host several people in a multi-client Jacktrip session and provide them with mixing, both to the final feed and among themselves. It attempts to be clear enough that it might provide an example for others. And it’s a demonstration of many aspects of this approach that could be improved with revisions to software and hardware
These examples are configured for an eight-way session between the host and seven remote participants. It provides a separate mix for each participant (in this case deleting them from the mix they’re monitoring — but with the option to be added back in if they choose).
It provides hardware-mixer (MOTU) and software-mixer (Ableton Live) examples — which hopefully provide enough detail to be generalized to other platforms. It’s also starting to accumulate variants like how to feed the mix to Zoom so that an audience can see/hear the performance.
Audio routing
Routing matrix for an external mixer.

Aux-mix matrix on a hardware mixer
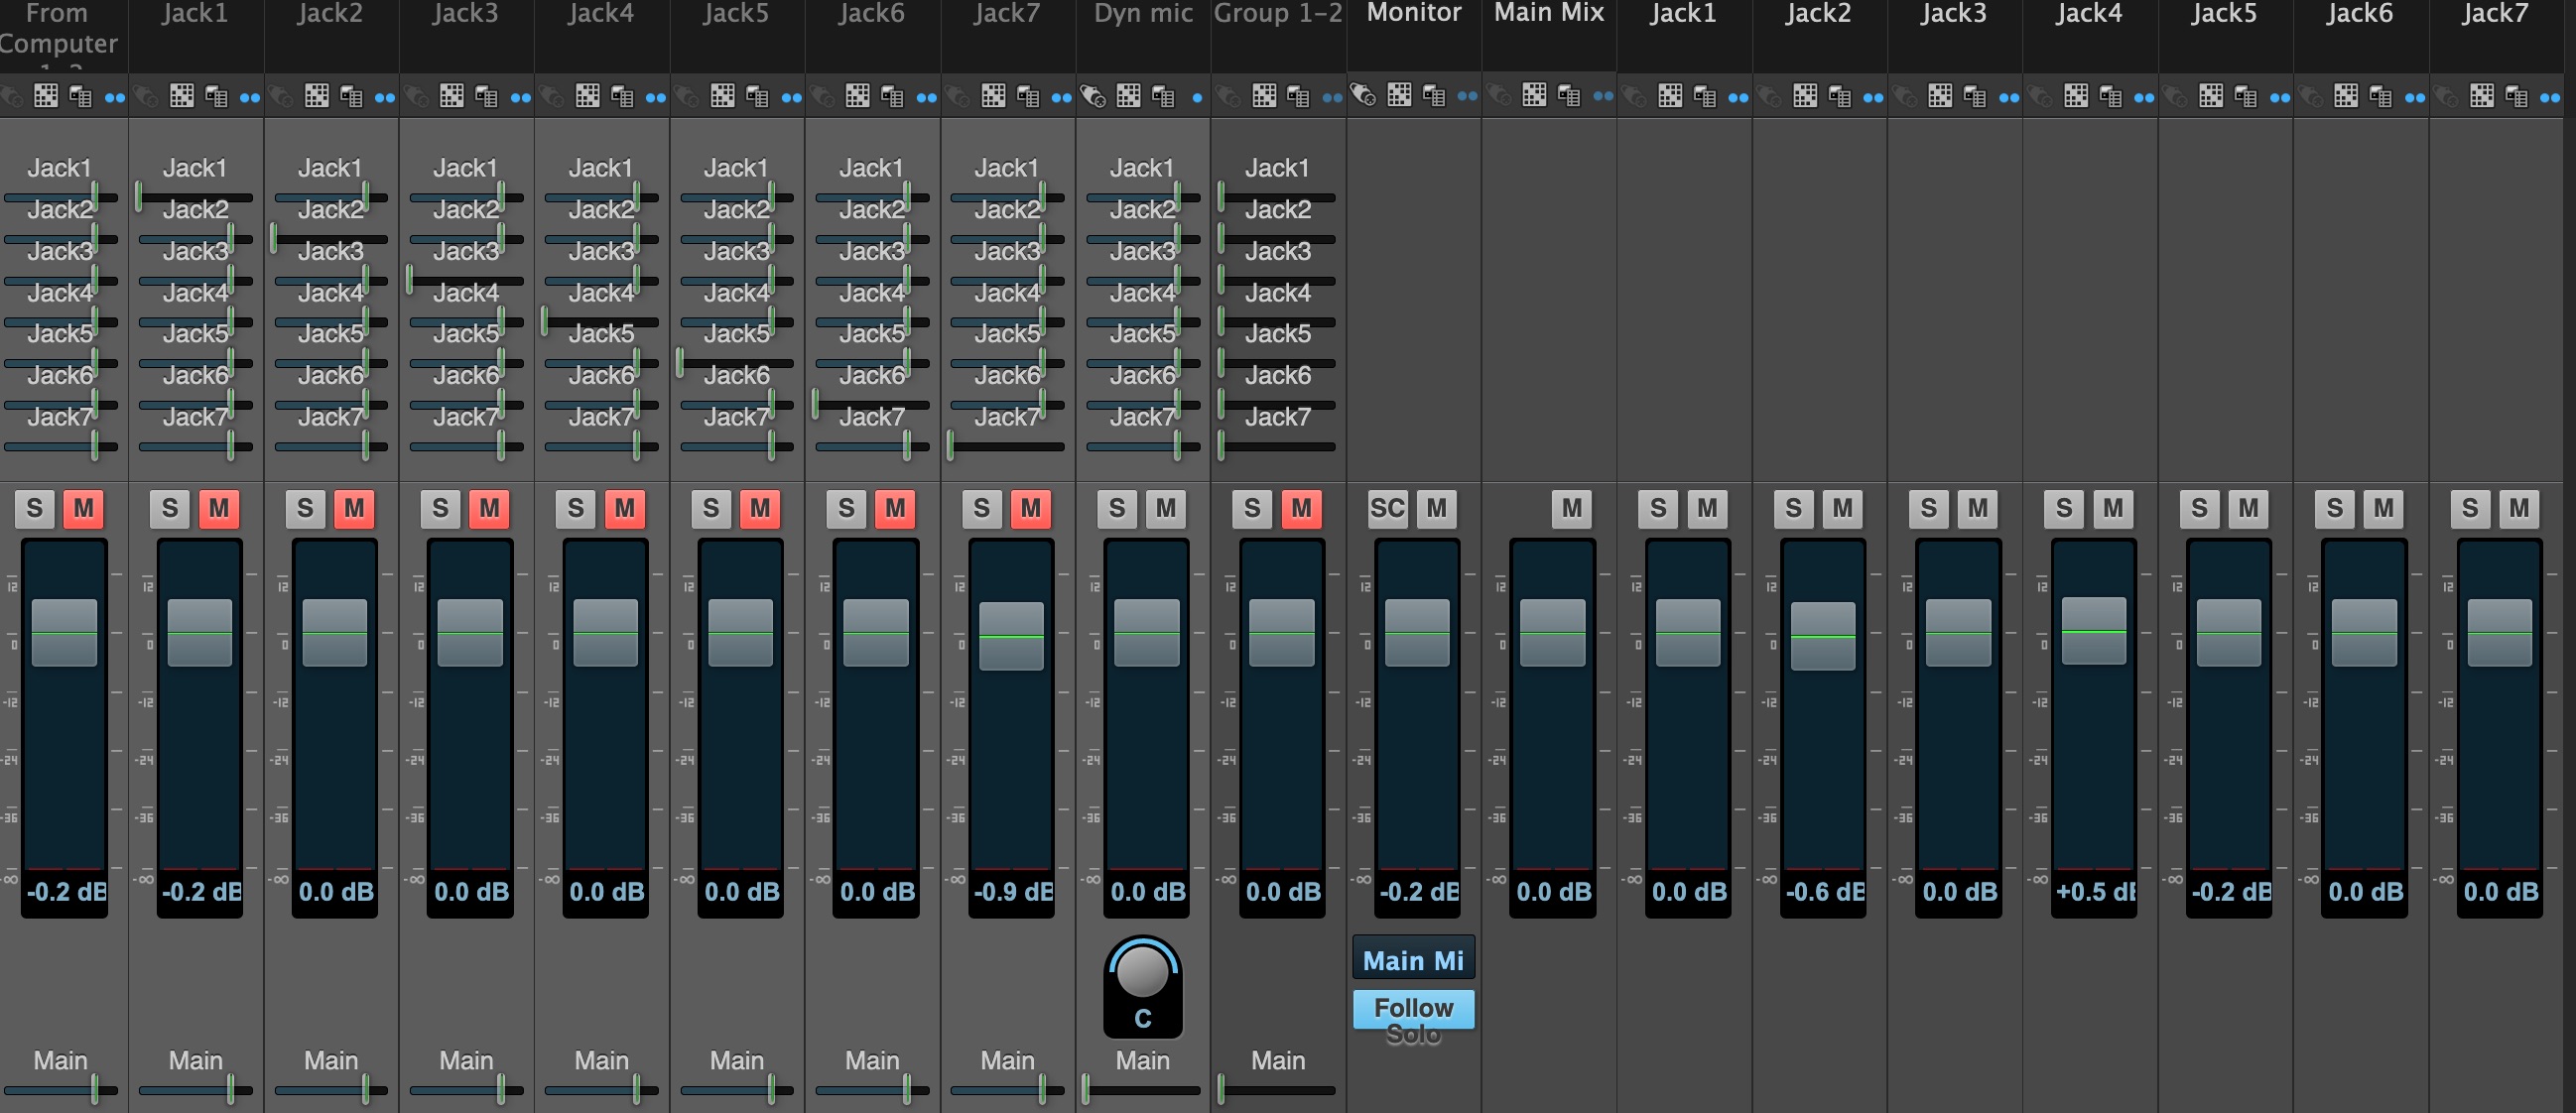
Audio routing and Aux-mix matrix on a DAW mixer
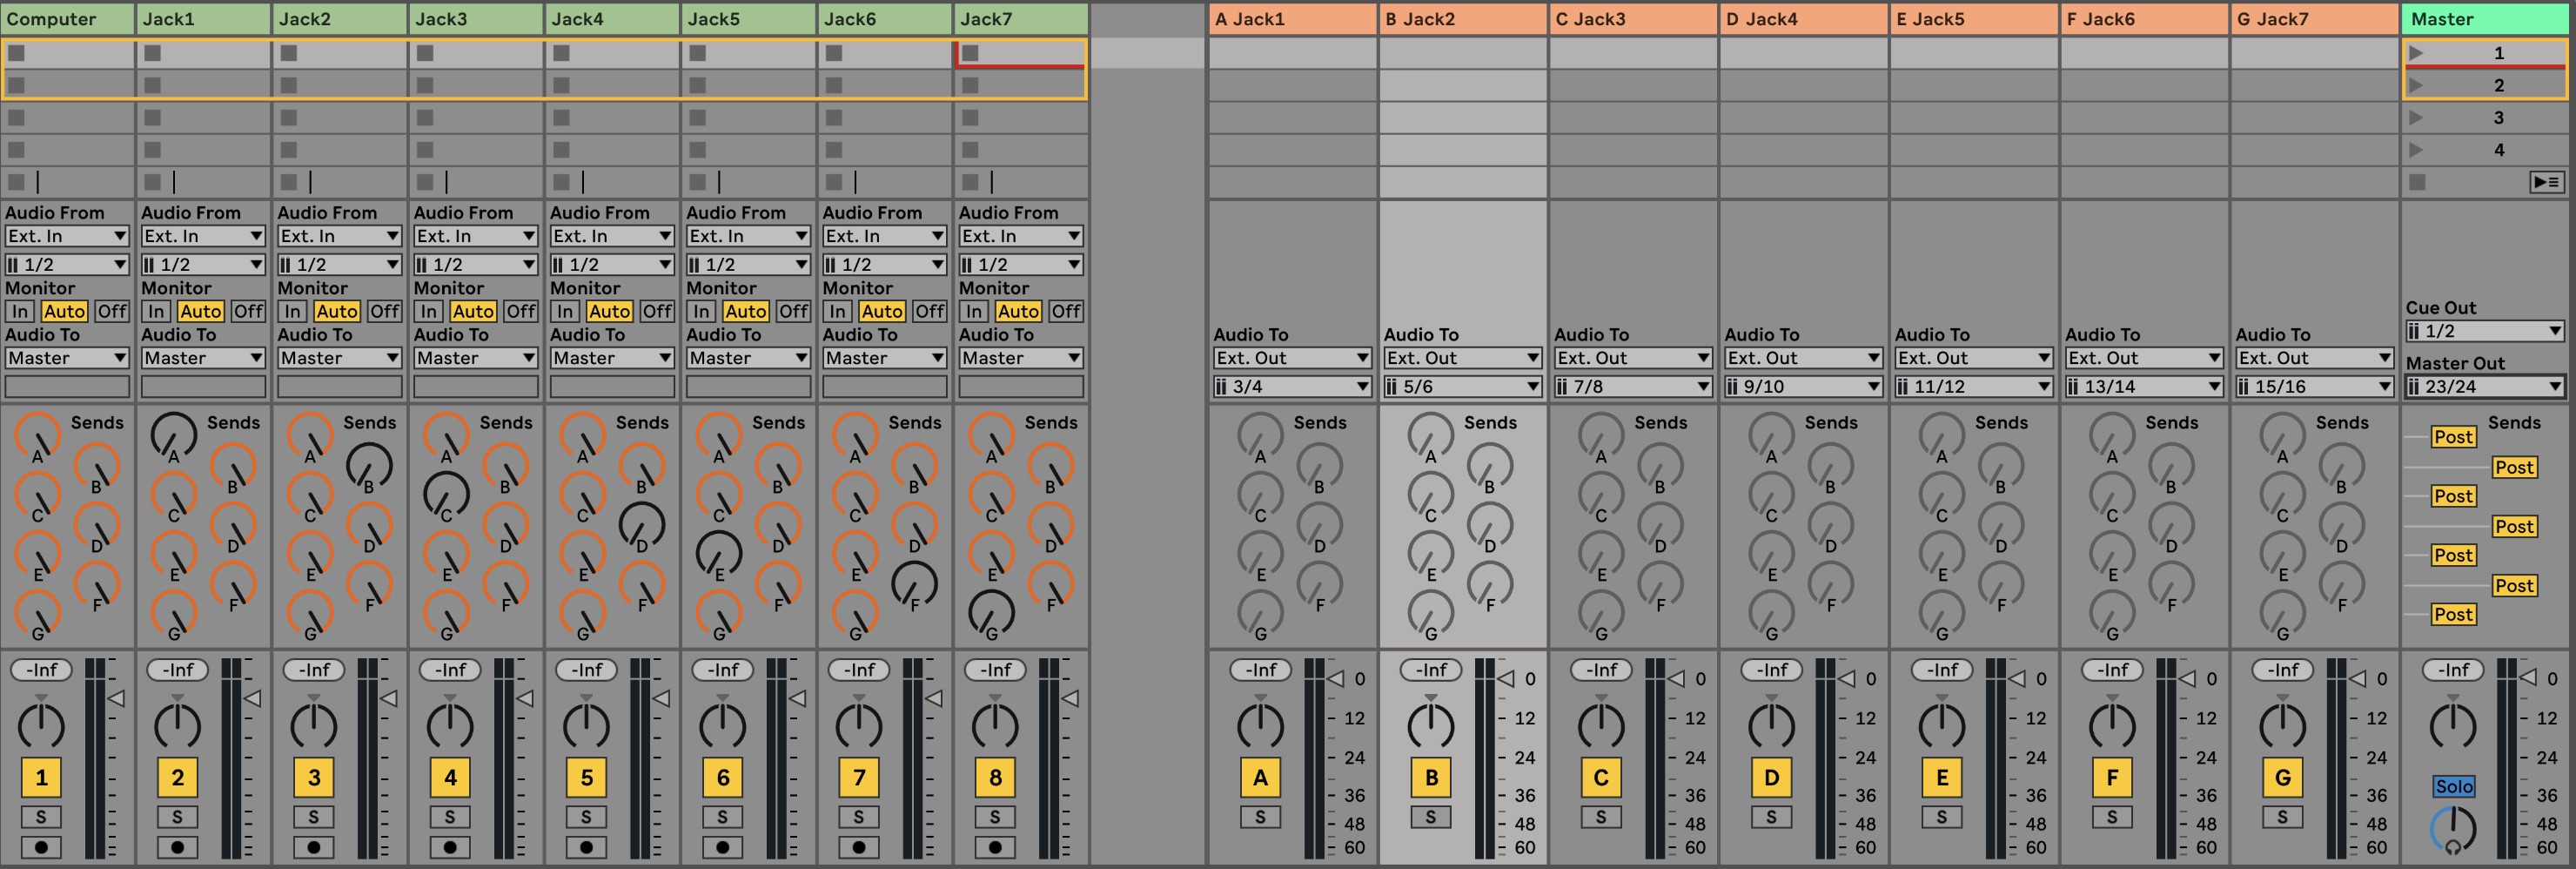
Jacktrip routing to match either of these templates
Here’s the routing when all seven Jacktrip servers are running, but no clients have connected.
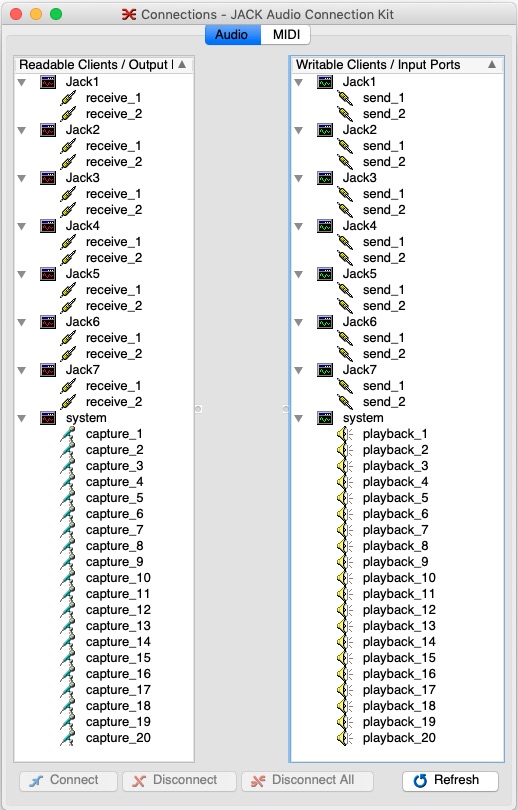
Here’s a single client, connected with the default routing that Jacktrip selects. Note that it chooses to use System channels 1 and 2 for input and output, which are likely to conflict with other applications on the server computer (a likely source of feedback)

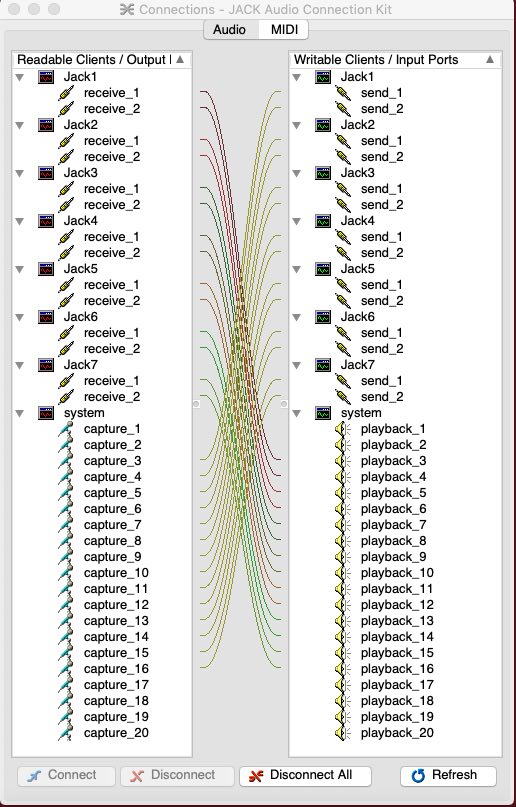
Routing after all seven clients have connected. They’re all using System channels 1 and 2. Again a warning, conflicts and feedback opportunities.
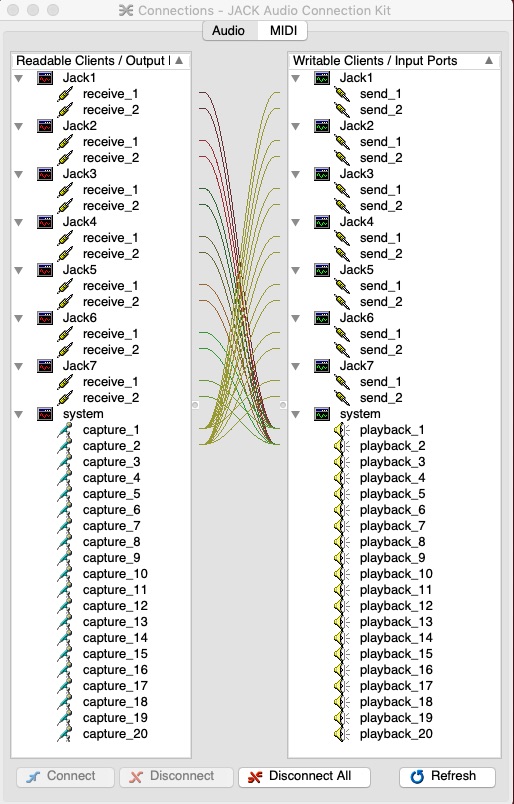
Final routing. No connections to System channels 1 and 2 and individual System channels assigned to each inbound and outbound server channel. The JMESS utility is extremely helpful to quickly establish (and renew) these. Download the Mac package installer here.
Comments:
Software mixer advantages
Software can scale up to a much higher number of Aux mix channels — the hardware can’t expand beyond the capability of the hardware.
Much less expensive
Hardware mixer advantages
External hardware doesn’t use computer resources
Much lower latency (approaching zero)
Advantages of putting a mixer in the Jacktrip audio chain
Able to monitor and mix individual channels
Able to add FX to both receive and send channels
More flexible routing to recording hardware/software
Disadvantages of putting a mixer in the Jacktrip audio chain
More complicated routing
Additional point of failure
Latency
This set of decisions, and the design and testing of the configuration, is best done well in advance of a session.
Getting participants’ computers set up — pre-session
I’ve had good luck using Omar Costa Hamido’s checklists for installing Jack and Jacktrip on Mac and PC. Share these links with participants and work through the rough spots with them well before the first session.
Omar’s tips for installing Jacktrip and Qjackctl on Mac and on PC
Suggestion: Do not try to debug tricky connection issues during the session. Set the expectation that people either connect successfully with perhaps a small nudge, or have to wait ’til next time.
Pre-session (at least a day in advance)
– establish preliminary parameters for the session (sample and frame rates, etc)
– prepare launch strings for Jacktrip servers and clients. For example:
Server strings
jacktrip -s -n 2 -o 0 –clientname Jack1 -z
jacktrip -s -n 2 -o 2 –clientname Jack2 -z
jacktrip -s -n 2 -o 4 –clientname Jack3 -z
jacktrip -s -n 2 -o 6 –clientname Jack4 -z
jacktrip -s -n 2 -o 8 –clientname Jack5 -z
jacktrip -s -n 2 -o 10 –clientname Jack6 -z
jacktrip -s -n 2 -o 12 –clientname Jack7 -z
Client strings
jacktrip -c [server IP address] -n 2 -o 0 –clientname Jack1 -z
jacktrip -c [server IP address] -n 2 -o 2 –clientname Jack2 -z
jacktrip -c [server IP address] -n 2 -o 4 –clientname Jack3 -z
jacktrip -c [server IP address] -n 2 -o 6 –clientname Jack4 -z
jacktrip -c [server IP address] -n 2 -o 8 –clientname Jack5 -z
jacktrip -c [server IP address] -n 2 -o 10 –clientname Jack6 -z
jacktrip -c [server IP address] -n 2 -o 12 –clientname Jack7 -z
– note: the “-z” option sets buffers to zero when underrun, which may or may not improve crackles in audio streams. Try both ways. If crackles persist, increase the number of frames/period for the session or drop the participant that is experiencing the problem.
– prepare and publish a setup email to participants (example below)
– meet with new participants to configure and test their setup, well prior to the session.
Session — Checklist for starting up the server
Get ready
– remove icons from desktop – Terminal
defaults write com.apple.finder CreateDesktop false; killall Finder
– shut off backups
– shut down apps
– shed internet-bandwidth-consuming apps throughout the local network
– open “communicate between musicians” Zoom session ON ANOTHER DEVICE (audio ON, video optional)
Get set
– prepare testing-computer to verify server connections prior to participants arriving (launch finder-music, Qjackctl, Jacktrip)
– load configuration into audio interface or DAW-mixer on server-computer
– start finder-audio on server-computer (input channels 1-2)
– choose talkback-mic option (Main mix? Aux mixes? neither?) in mixer
– load session options into Qjackctl and audio interface (or DAW)
Go
– launch seven Terminal windows on the server-computer, each of them (one per connecting client) with server-strings developed pre-session.
jacktrip -s -n 2 -o 0 –clientname Jack1 -z
jacktrip -s -n 2 -o 2 –clientname Jack2 -z
jacktrip -s -n 2 -o 4 –clientname Jack3 -z
jacktrip -s -n 2 -o 6 –clientname Jack4 -z
jacktrip -s -n 2 -o 8 –clientname Jack5 -z
jacktrip -s -n 2 -o 10 –clientname Jack6 -z
jacktrip -s -n 2 -o 12 –clientname Jack7 -z
– launch another terminal window with JMess (which gets run each time a new client connects). the -d option disconnects all and reconnects them — which is a good way to clear out the default channel-1/2 connections that each new client creates
jmess -d -c [path to xml file containing Qjackctl routing]
– launch seven Terminal windows on the test-computer, each of them (one per connecting client) with client-strings developed pre-session.
jacktrip -c [server IP address] -n 2 -o 0 –clientname Jack1 -z
jacktrip -c [server IP address] -n 2 -o 2 –clientname Jack2 -z
jacktrip -c [server IP address] -n 2 -o 4 –clientname Jack3 -z
jacktrip -c [server IP address] -n 2 -o 6 –clientname Jack4 -z
jacktrip -c [server IP address] -n 2 -o 8 –clientname Jack5 -z
jacktrip -c [server IP address] -n 2 -o 10 –clientname Jack6 -z
jacktrip -c [server IP address] -n 2 -o 12 –clientname Jack7 -z
Here is a screenshot of the server after that’s complete:
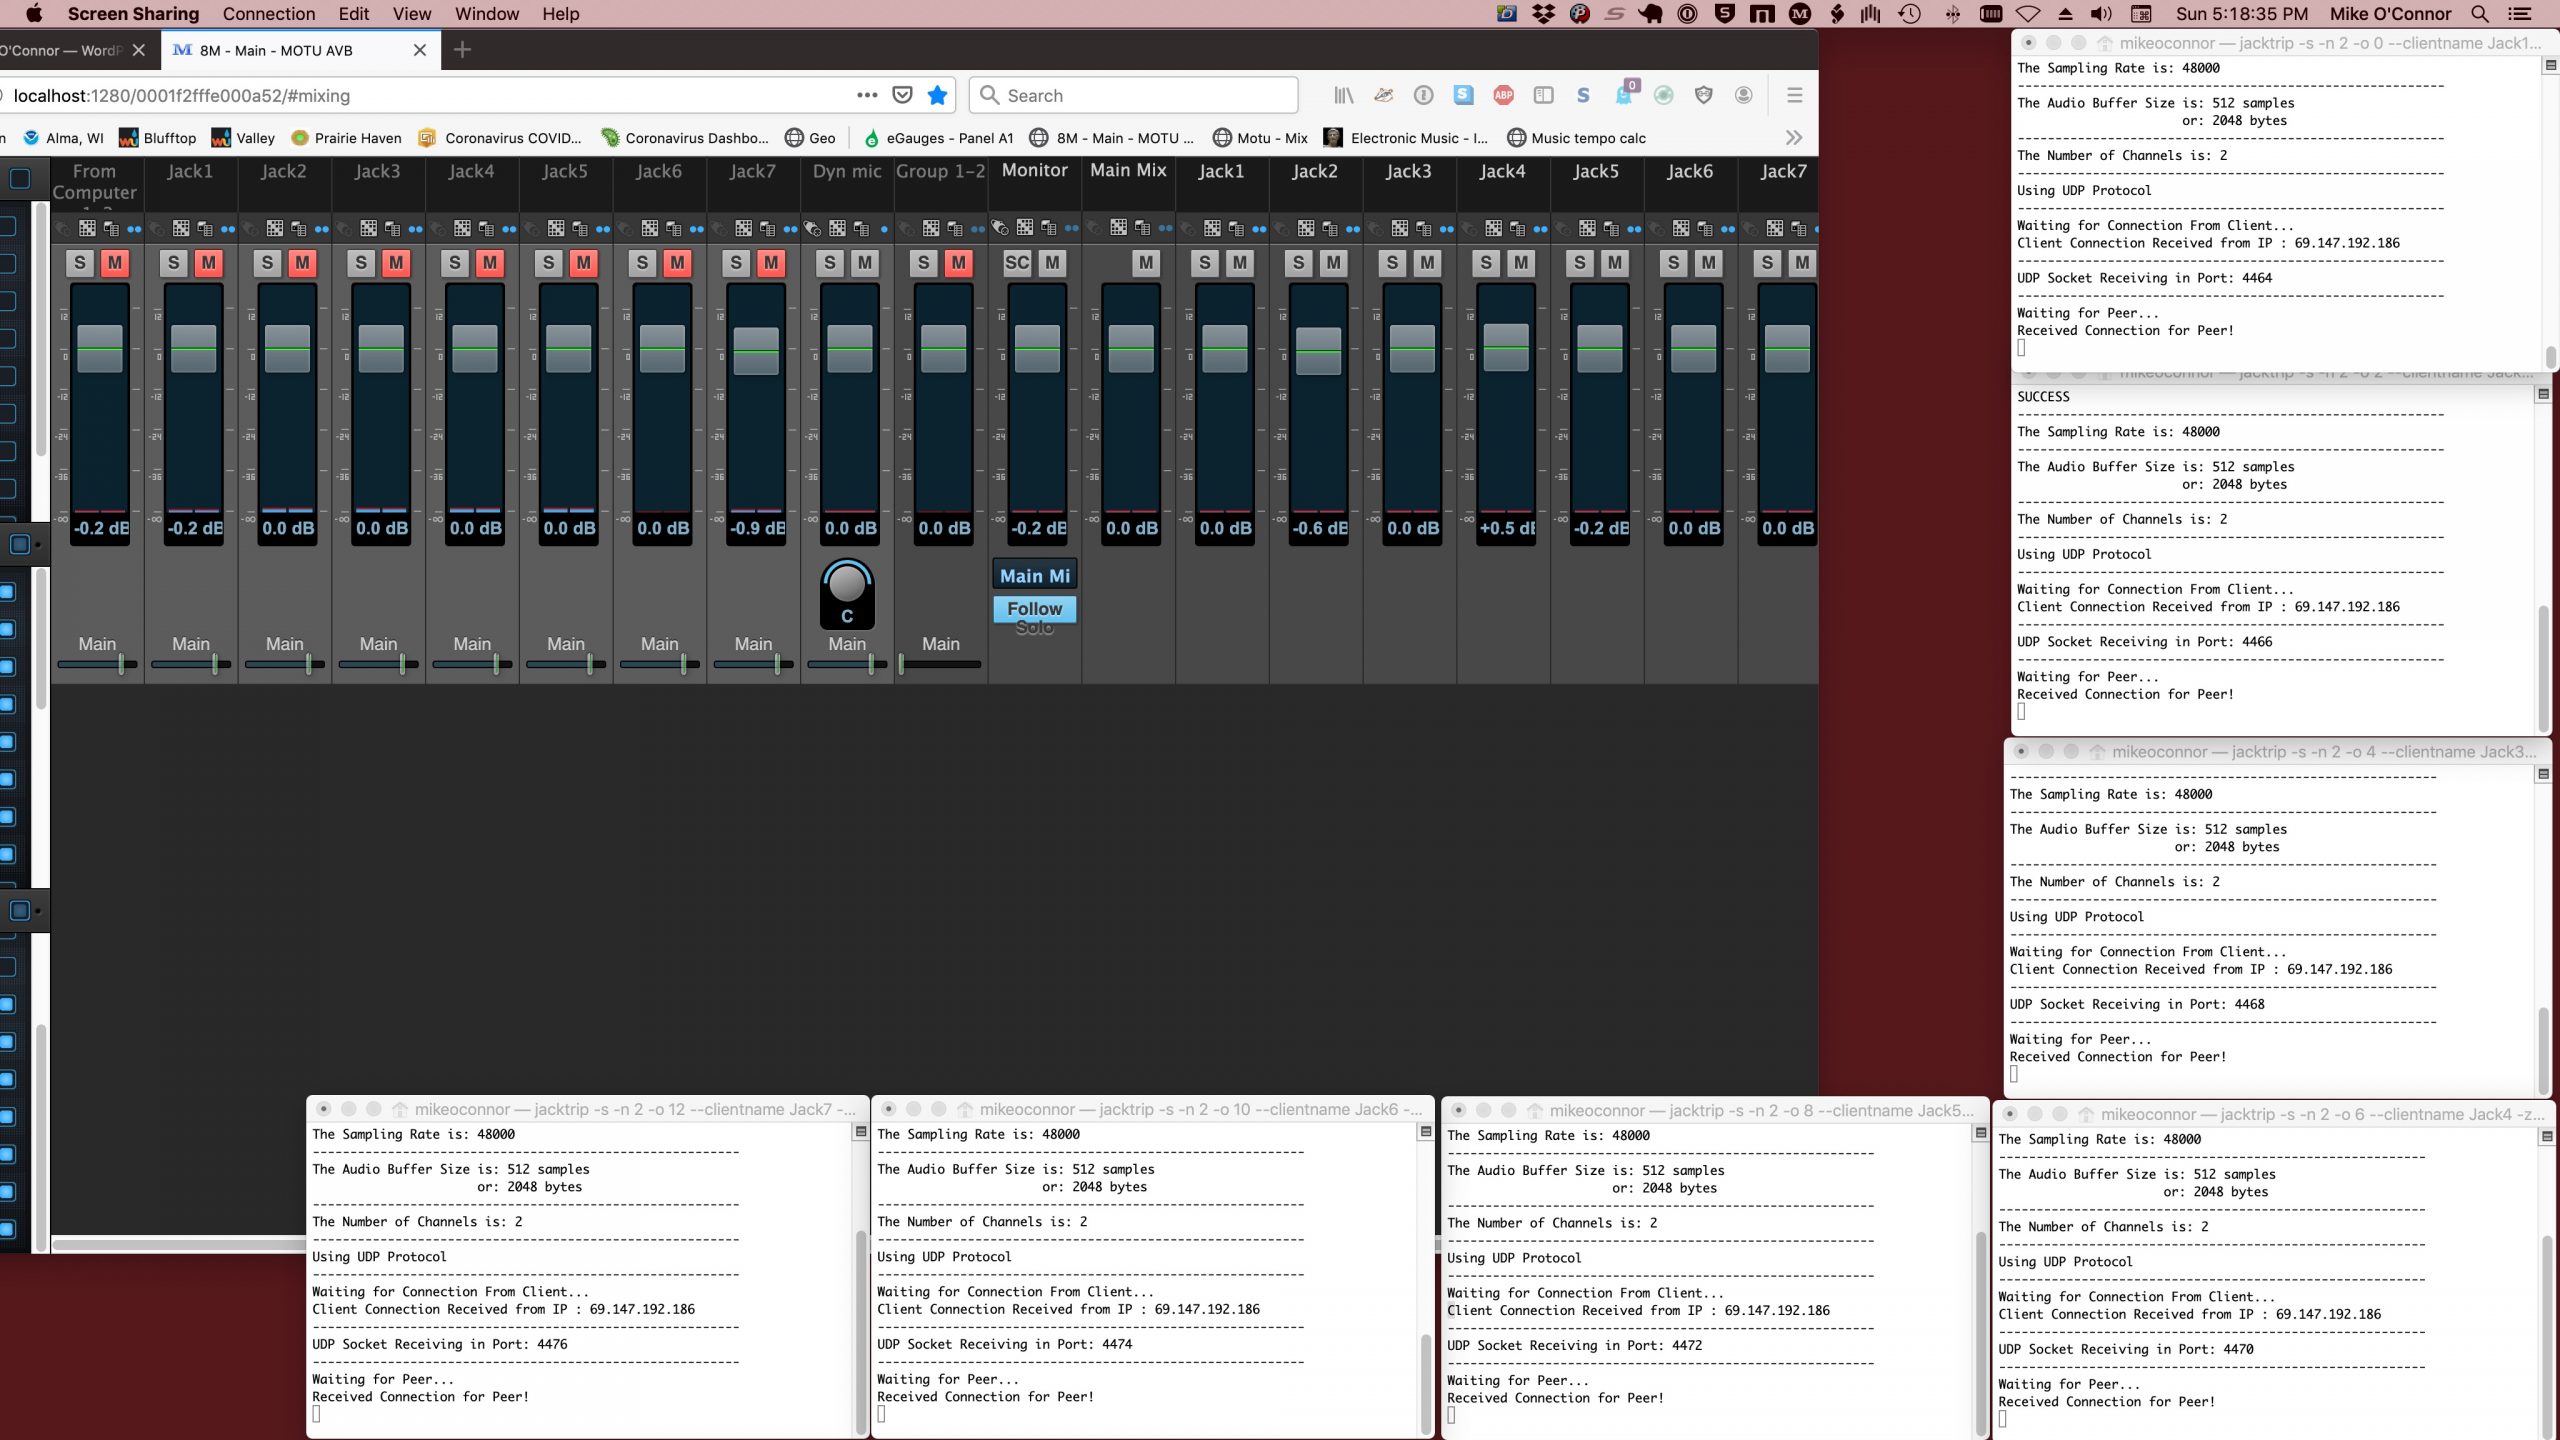
– revise the audio routing (either by hand or using JMESS) to this.
– leave the servers running and shut down client sessions on the test-computer so that the routing configuration is retained but the servers are available for connection by participants.
– welcome participants as they arrive, work through connection issues, and remember to refresh the routing every time a server-instance crashes or needs to be restarted.
– enjoy the music!
– monitor audio quality but note that a change in buffer size (often needed to reduce crackling) will require that everybody will have to shut down, reconfigure and restart their client session, as will the server.
– monitor for dropped sessions (often accompanied by loud buzzing). Mute that channel in the mix, drop and restart that server, cue the participant to restart and rejoin, bring them back into the mix.
– [optional] open the “performance” Zoom session on the server-computer if the group is sending their performance-mix to Zoom. (audio MUTED until the leader of the Zoom session requests audio)
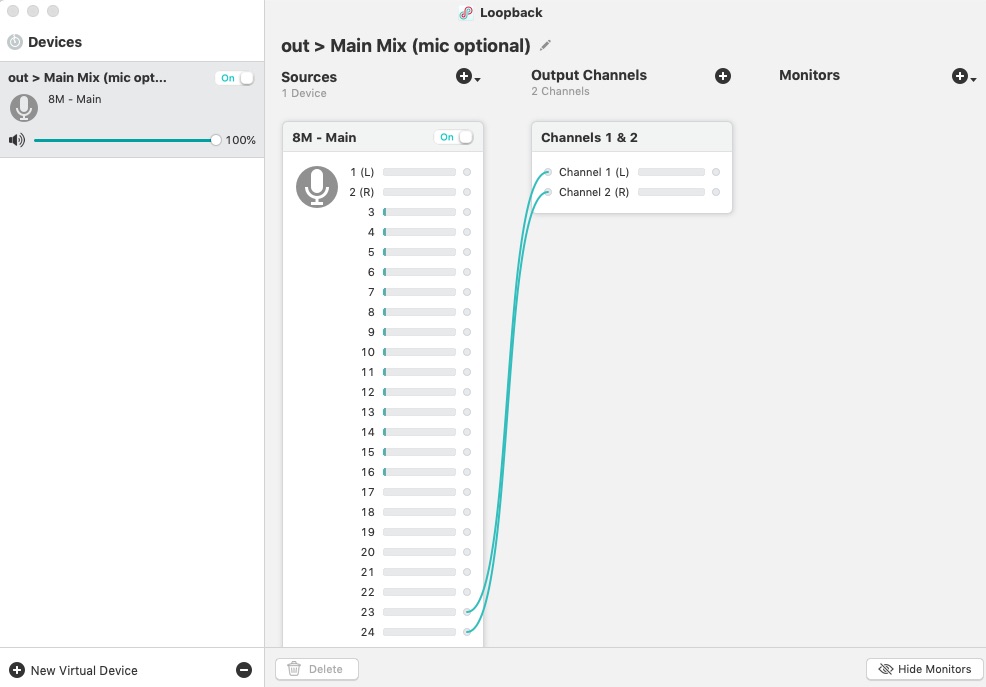
– in that case, build a Loopback device and use it as the “Microphone” in the performance Zoom session. Here is an example consistent with the routing in this example where the Main Out is routed to channels 23-24. Note: be wary of using a Monitor in this device.
Sending the audio mix to a Zoom session
– Note: Zoom may eliminate the need to provide mixes back to performers . They may elect to monitor themselves through Zoom in order to fit their music into the high-delay Zoom mix. This allows the hardware mixer to scale to much higher numbers of performers, because Aux channels (often the limiting factor for the mixer) are no longer required.
Extra steps:
– run Loopback and confirm Loopback routing to Zoom audio “Microphone”
– open Zoom – this is the “performance” Zoom session
– verify that Zoom audio is fed by Loopback
– join “performance” Zoom instance (video ON, mic OFF at first — ON for performance)
– turn on Original Sound
– open “communication” Zoom instance ON ANOTHER DEVICE (video OFF, mic ON at first, OFF for performance)
– start finder music and verify audio on “communication” Zoom
Pre-session email — template
Note: this needs to be carefully edited before sending to participants, especially the logistics of an Zoom sessions if it’s being used.
hi all,
When:
[optional: instructions for connecting to a Zoom session]
Peepul — connect to our rehearsal Zoom at ___ Eastern time — we’ll hook up JackTrip and do a sound check
– connect to Zoom with a different machine than the send-to-Jacktrip computer if at all possible
– as you join; enable your audio in Zoom, communicate through Zoom audio, send video to Zoom
– once you’ve connected to JackTrip; mute your audio in Zoom, talk through JackTrip (or chat), monitor audio through Zoom and send video to Zoom
– disable the “sleep” functions (computer, screen, disks, etc.) in the send-to-JackTrip computer
[optional: add disconnect/reconnect to Zoom instructions if the group is moving from a staging session to a performance session]
Pre-session checklist
try to work through this list before the call/session. Stop wherever you get stuck, anything you’ve done will make the rest of the job that much easier.
get ready
– shut down as many apps as possible
– coordinate with others in your household to reduce their use of the internet
– turn off the VPN (if you have one)
– verify that you’re connected with an ethernet cable and that wifi is turned off
– check your bandwidth (to see if you have good connectivity to me). Here’s how:
– connect to www.SpeedTest.net through a web browser on your connect-to-JackTrip computer
– use the “Change Server” function to select “Eau Claire, WI (USA)” as the town and “Airstream Communications” as the server-provider
– run the test and note the “Ping” “Download” and “Upload” results – that test is to a server that’s just upstream from me on the internet
get set
– on the connect-to-JackTrip machine:
– connect mics, instruments, audio interfaces, etc. (note: the Audio MIDI Setup app is helpful for selecting the one you’re going to use)
– open QJackCtl program
– our session will use the following settings — enter them in Qjackctl – Setup
– Frames/period: 512
– Sample rate: 48000
– click “start” in QJackCtl and use the attached cheat sheet to address error messages (plus other tips that have been suggested along the way)
go
– launch the Terminal program
– find “your” version of the command-string, copy/paste it into the Terminal window and hit enter.
Player1 jacktrip -c 69.147.192.186 -n 2 –clientname Jack1 -z
Player2 jacktrip -c 69.147.192.186 -n 2 -o 2 –clientname Jack2 -z
Player3 jacktrip -c 69.147.192.186 -n 2 -o 4 –clientname Jack3 -z
Player4 jacktrip -c 69.147.192.186 -n 2 -o 6 –clientname Jack4 -z
Player5 jacktrip -c 69.147.192.186 -n 2 -o 8 –clientname Jack5 -z
Player6 jacktrip -c 69.147.192.186 -n 2 -o 10 –clientname Jack6 -z
Player7 jacktrip -c 69.147.192.186 -n 2 -o 12 –clientname Jack7 -z
– take a break — no matter what the response in Terminal. “waiting for connection from peer” is the norm, but not critical
Qjackctl startup cheat sheet
Click HERE for the current version of my Qjackctl tip-sheet.