Author Archives: Mike O'Connor

Mom’s old musicbox

One of the joys of moving is that you find old stuff that folks have been wondering about. Our move didn’t find some photos that Dad is looking for, but it did turn up the disks for Gracie’s old music box.

We pulled the music box out today and fired it up. It still works, although the the workings sound like they need cleaning and oiling — no wonder, it’s been in our closet for at least 25 years and probably hasn’t been used in 75.

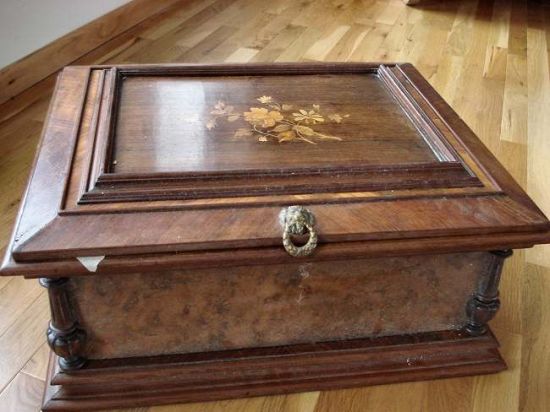
Music box

Here’s the music box, all closed up.

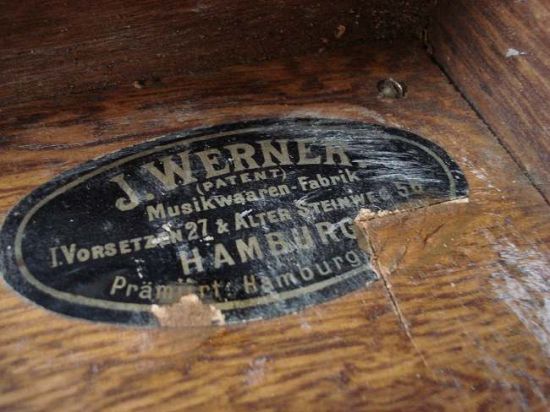
Music box name plate

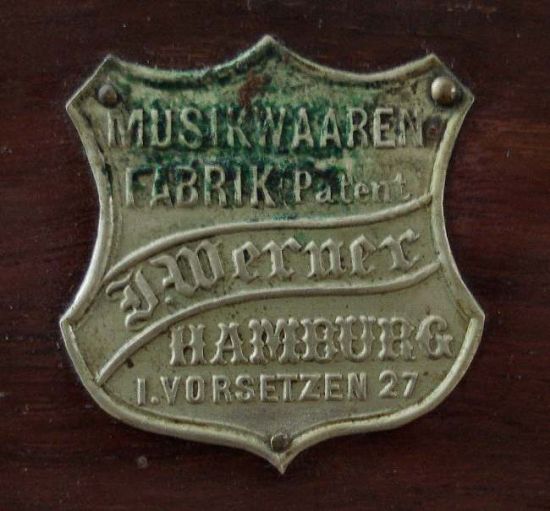
Here’s the nameplate — J. Werner of Hamburg, a “Musikwaaren Fabrik” made in Hamburg. My guess would be late 1800’s, but it’s hard to tell. Not much comes up when I do a search on those terms.

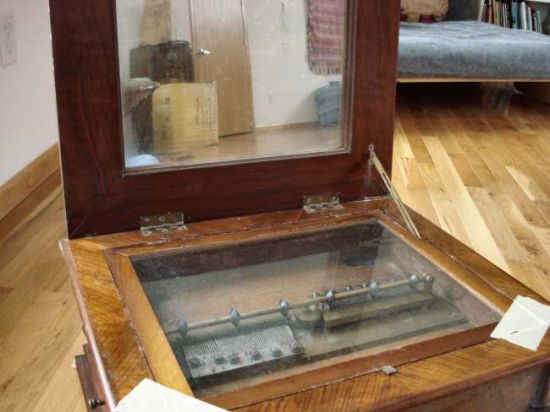
Music box - open

Here’s the box all opened up. Dang, I wish Mom hadn’t used masking tape to hold that glass lid in place. I’m going to have to find some magic goo to get that stuff off without lifting the finish.

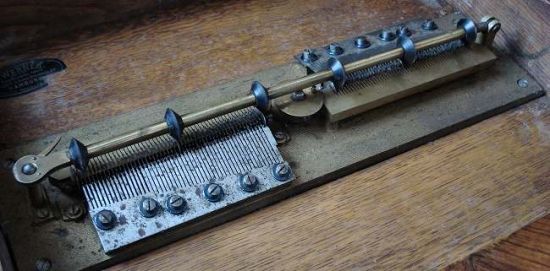
Music box - combs

Here’s a picture of the combs — looks like 2 combs t’me. Some more cool goo, plus some gentle work with the Dremel tool, required to clean those up.

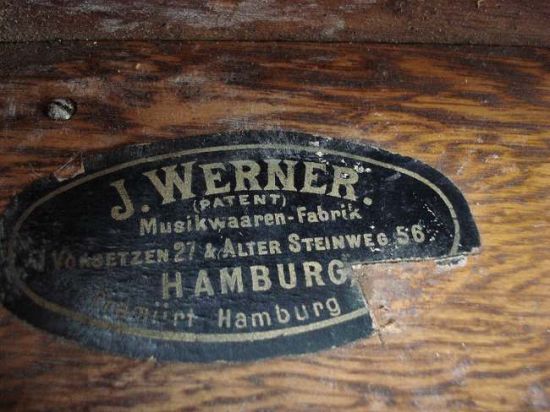
Music box - makers mark 1

Here’s the first of two name-stickers on the inside of the music box. It’s interesting that both this one and the other one (see below) have had a corner cut out of them. Since it’s the same corner, and it’s clearly on purpose, one wonders what was going on here.

Music box - makers mark 2

See? They really went after this one with their razor knife. Strange

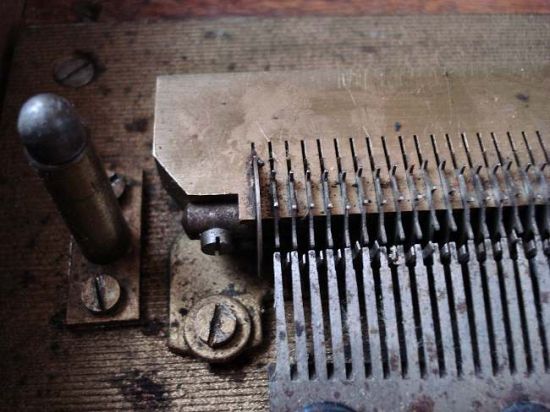
Music box - comb and damper detail

Here’s a detail shot of the combs. There are little dampers off to the right side of each comb that quiet the note before it’s plucked again. Some of those dampers look pretty narly.

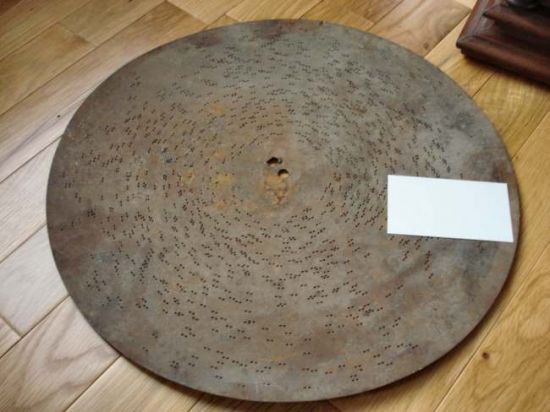
Music box - disk

Here’s a disk (we have about 20 in the stack). Some are just rusty like this one, some are covered with some kind of weird moldy varnish-like stuff.

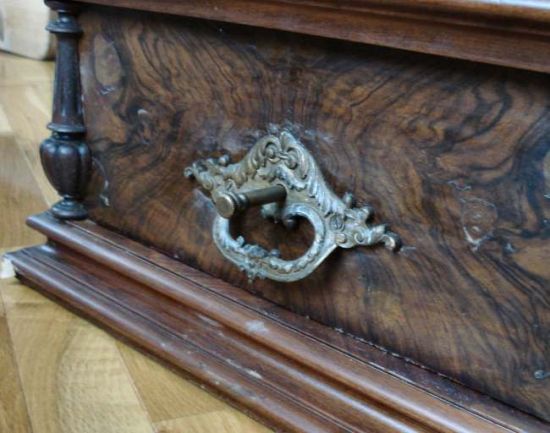
Music box - side

And here’s a detail shot of one of the side handles.

I think I may peck away at restoring this a little bit. I view this as a connection back to Mom and Gracie which would be nice to bring back at least to operating condition. I’ll post progress notes to the blog as things unfold. There are folks who are interested in these music boxes, they call themselves the Music Box Society International. I think I’ll hook up with my local chapter and see what kind of resources they have. There’s also Nancy Fratti, who is really into restoring music boxes like these and runs classes in how to do it. It would be fun to go out and take her class.

I recorded one of the disks. Click HERE to listen to the recording. It’s got lots of whirring noises in it — that’s the gizmo that needs oiling and cleaning. But the sound is really neat nonetheless. A great old thing — hopefully a little TLC will bring it back.

Mike’s Idiot’s Guide to the Truax Seed Drill

We planted the last prairie field this weekend — here’s Marcie’s post about the whole thing.

We rassled with the manual for the Truax Flex style drill — the model number of the one we were messing with was FLX-88, but I think these comments apply to any FLX model grass drill made by Truax. The problem I had was that the manual for that drill is written for people who aren’t idiots. The audience for the manual probably care about the stuff that’s in it, but all I wanted to do was hook up the drill, put seed in and plant. The manual doesn’t help with that at all, so this is my replacement — mostly for the next time I use the drill, but maybe it will help you too.

Puzzle Number One – What are the “transport locks” they’re talking about?

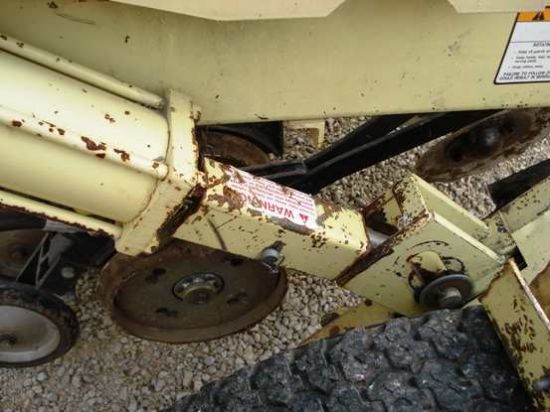
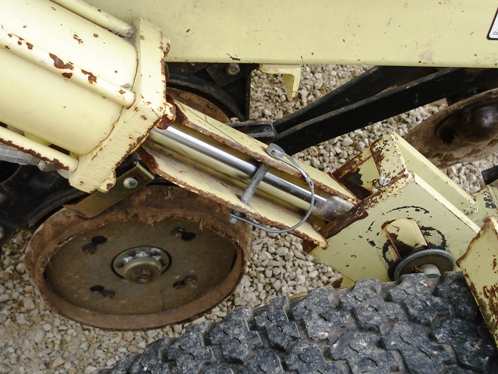
The manual has a dreadful picture (and only one) of the transport locks. So here are a few more, that make it obvious what’s going on.

This picture mirrors the one in the manual;

DSC00925

This picture shows the lock turned so that you can see it. Ok, so those have to come off before you start using the drill. Hook up hydraulics, raise the drill a little, take the blocks out. I get that.

DSC00924

Puzzle Number Two – Storing the trailer jack

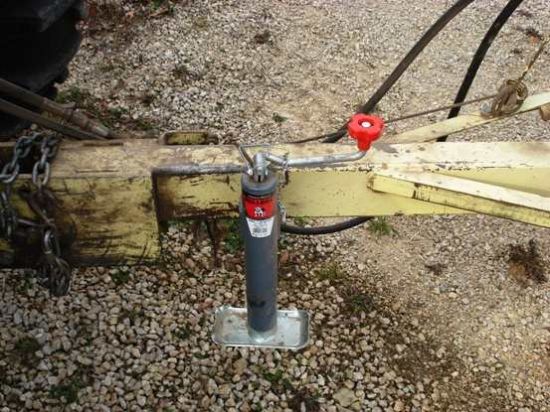
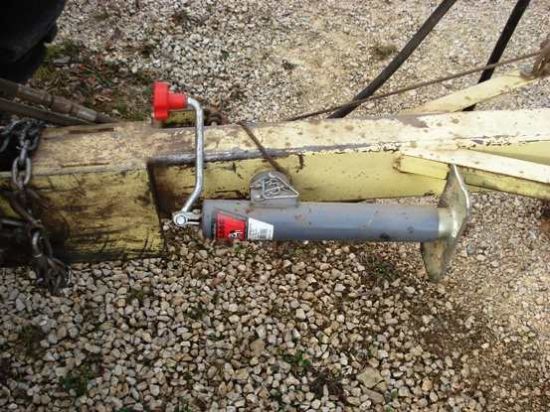
Here’s just a stupid thing — I found it was a lot easier to rotate the jack and leave it on the drill than to pull it off. All the holes are set up for that. Here are two pictures to show you what I’m talking about.

Jack down;

DSC00937

Jack stored;

DSC00936

Puzzle Number Three – Making the drill actually work

I had a heck of a time figuring this out. Fortunately Dan Olson was home and clued me in. But the manual provided no hint. Here’s the deal.

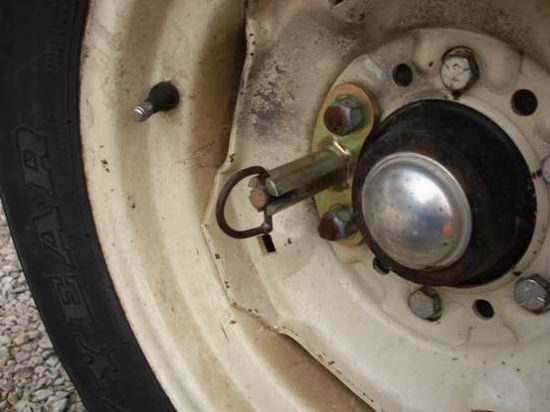
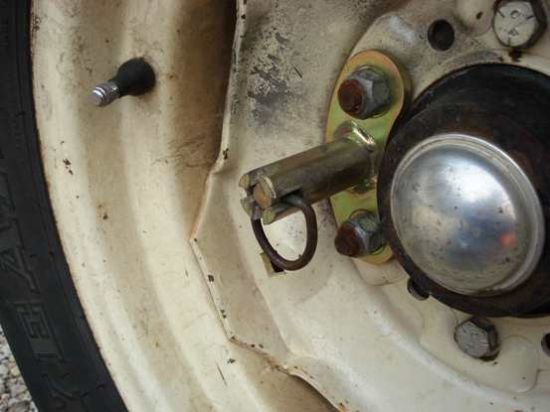
There’s a little pin on the drive wheel that makes this happen. Here’s a photo of the pin the way we got the trailer. See? It’s pulled further out;

DSC00928

And here’s a picture of it in the position where the chains and gears and stuff will actually do something. It’s further in;

DSC00927

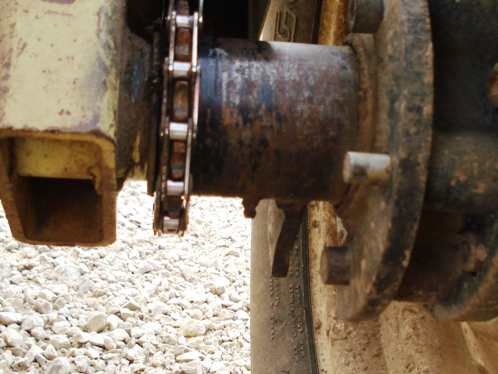
Here are pictures of the back side of the wheel that shows the opposite end of that pin. This first photo is in the non-engaged position (the one you would use to tow the drill to a new place). When the wheel goes around, the pin missed that ratchet thingy and as a result none of the gears turn;

DSC00929

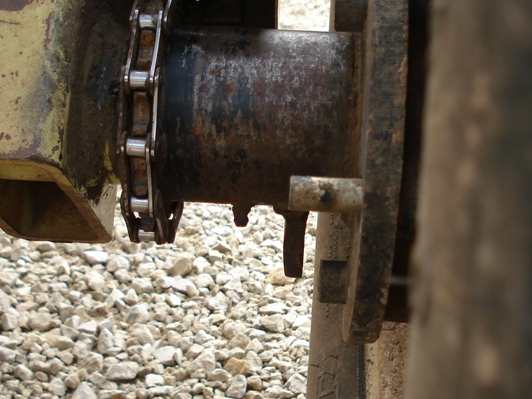
Here’s a picture of the engaged position. Now the pin sticks out far enough to catch that ratchet thingy and the gears and bobbins and whatchacallits all go round and round;

DSC00930

Warning Number One — Check the seeding rate that the drill is set up for

Sheesh. We didn’t check this before we started. The lads at the DNR told us that the drill was set up for the lowest seeding rate, and we believed them. Not. It was set for the MAXIMUM rate, so we dumped about a jillion dollars worth of seed into about a quarter mile of furrows before we realized what was going on. Moral to the story — ALWAYS check.

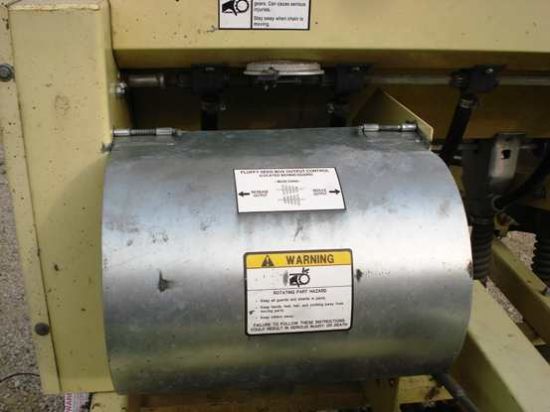
Here’s where to look — behind this here silvery dingus. It swings forward;

DSC00931detail

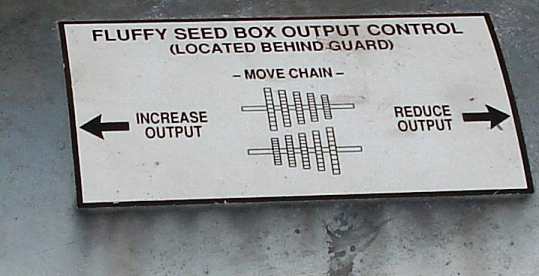
Here’s the little decoder-ring that tells you which way the gears work. Ours came with the chain on the far LEFT set of sprockets. For planting prairies you’ll probably want them on the far RIGHT set of sprockets;

DSC00931

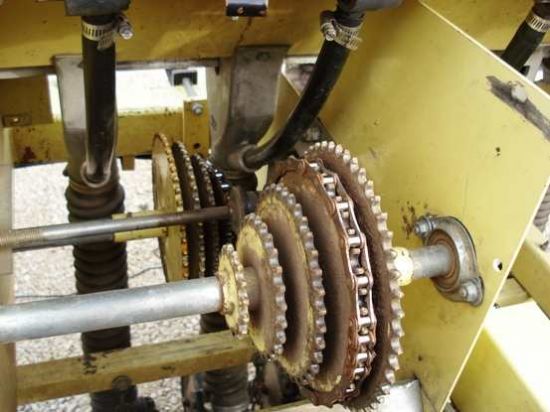
We tried the drill on the far right side for a while and concluded that it was too light, so we moved up one notch. Here’s a picture of the way we had it set up;

DSC00932

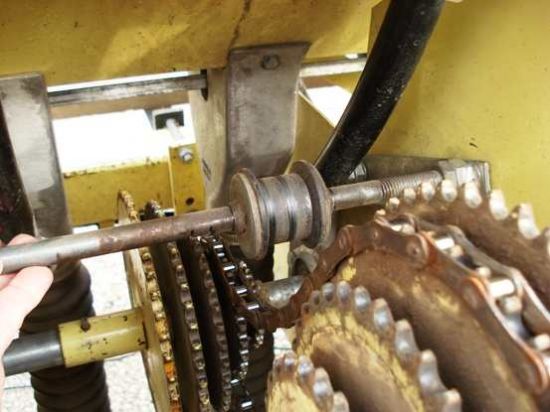
You change the chain by lifting that little idler-wheel up off the chain, fiddling with the chain until it’s on the right pair of sprockets and then moving the idler over so that it centers on the chain in it’s new position. This is a picture showing how the idler swings up away from the chain;

DSC00934

Warning Number Two — Beware of the “small seed” box, it overfeeds

We wound up using the drill ONLY on fluffy seeds. The small-seed box fed the seeds WAY too fast, even on the slowest gearbox setting. If I wanted to make a lifetime hobby out of this drill, I would have fiddled with that adjustment too. But I don’t. If anybody has messed with that set-up and wants to add a comment to this, feel free. But we just skipped it.

Editorial Comment — None of this information is in the manual

I know that for farm-equipment hotrods, this looks like the ravings of an idiot. But me I’m just a weekend warrior and figure maybe you are too. In which case, this little write-up might save you some time and aggravation.

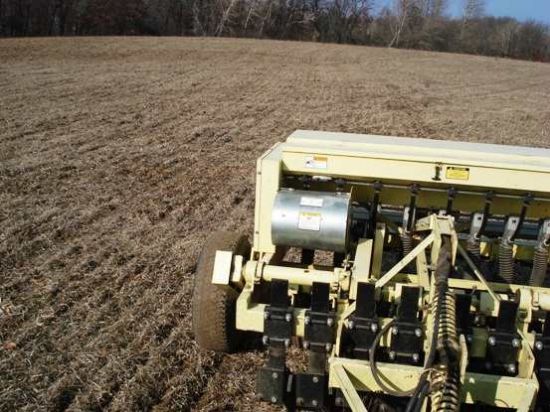
The big reward — here’s a picture of the field as I’m dragging the drill behind TracDor.

DSC00922

Winterize your RV — the easy way, no fittings required

This is a “winterize the RV” reminder post for me, and a “how to” post for you.

There are lots of articles out on the ‘net that talk about winterizing an RV. Most of them are repeats of the same article and, while the approach will work, it’s a lot harder than it needs to be. I learned this approach from the old codger that was minding the RV portion of WalMart when I went in to buy anti-freeze and a few parts. I was after a fitting to hook my air compressor up to the city-water inlet — he talked me out of that approach and told me this one instead. So I thought I’d share it.

Conventional approach;

– Blow out the water in all your plumbing with compressed air (requires a special fitting, and great care not to over pressurize your lines with the air compressor — no more than 25 psi por favor)
– Use the water pump to suck antifreeze out of the jug, either by disconnecting the line to the fresh water tank or by installing a T-valve that allows you to do this without disconnecting. Either way is a hassle, involving plumbing changes.

Old Codger Approach;

– Drain all the tanks.
– Put anti-freeze in the fresh water tank (using the sophisticated device in the picture below)
– Use the water pump to distribute the anti-freeze, without messing about with your plumbing

It worked great — took about 5 gallons of anti-freeze, but I was being liberal in my use since WalMart had it on sale for 2 bucks a jug. It took about 3 gallons to prime the water pump.

Here are pictures of the various bits, and after that is a detailed checklist (mostly so I remember what I did)

Picture 1 — Sophisticated device to insert anti-freeze into fresh water system.

The funnel is all chopped up because I also use it to change the oil in the PowerTrac and it needs to fit into a really tight space. I may splurge and buy a new funnel.
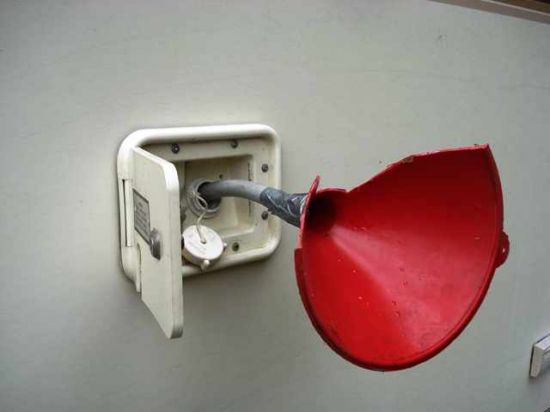
HoseToTank

Picture 2 — Hot Water Bypass

These valves on my RV are configured in the “normal” position in this photo. So water is supplied to the hot water tank from the fresh water supply, fills up the tank and the exits as hot water to the faucets. Turning all three valves 90 degrees bypasses the hot water tank (meaning that you don’t have to fill the water tank with anti-freeze before anti-freeze gets to the faucets). I let some anti-freeze go into the (previously drained) water tank before I bypassed it.
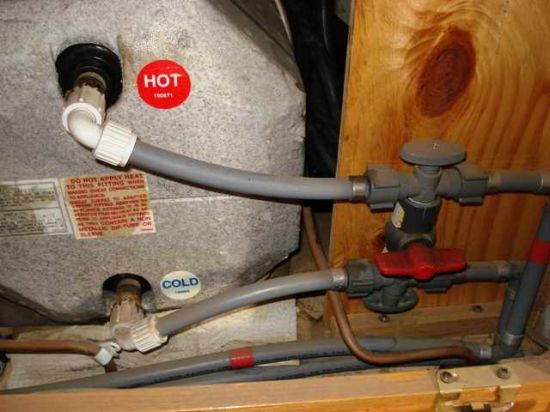
HotWaterByPass

Picture 3 — The drain plug on the hot water tank

Just a reminder — drain the water tank, put the plug back in, put some anti-freeze in there.
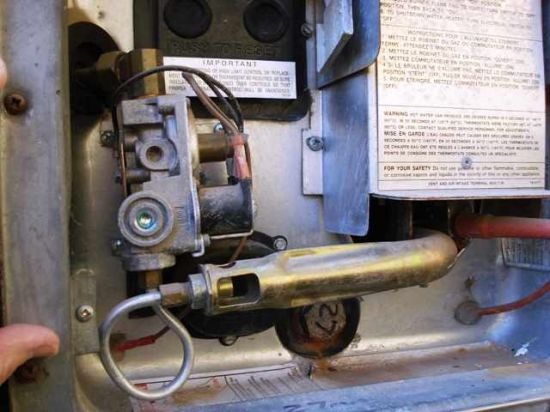
HotWaterDrain

Photo 4 — Water pump

See the connection between the water pump and the fresh water tank right behind it? That’s the one that I’d have to mess around with if I used the Traditional approach to all this. Some people would have you cut that short line, insert a T-valve that chooses between the fresh water tank and a hose that runs down to the anti-freeze jug. What a hassle. What a huge opportunity to introduce leaky joints in your plumbing system.
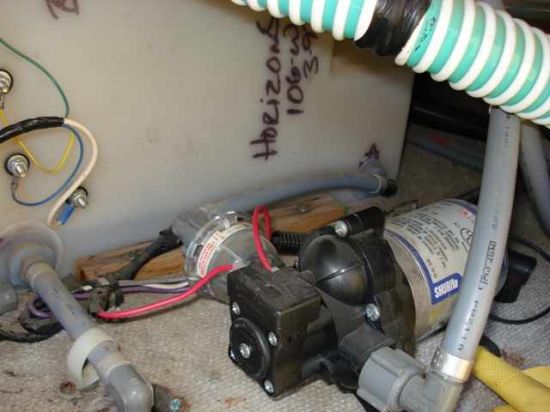
WaterPump1 01

Checklist;

Ok, here’s the step by step (so I remember next time).

Winterizing

– Drain everything (fresh water, hot water, gray water, black water) and then close them back up
– Pour 4 gallons of anti-freeze into fresh water tank
– Bypass hot water heater
– Turn on water pump
– Open faucets and toilet until they run pink (anti-freeze is pink)
– Drain gray and black water tanks again (probably don’t need to do this, but there’s a mix of fresh water and anti-freeze in there right now)
– Run some more anti-freeze into black water tank through toilet
– Run some more anti-freeze into gray water tank by pouring some into each trap
– Turn off the water pump for a second
– Un-bypass the hot water heater
– Fire up the water pump and let it put some anti-freeze in the hot water tank
– Turn off the water pump

Undoing the winterizing

should go something like this;

– Flush the anti-freeze out of the fresh water tank and, when the time seems right, shut off the drain valve and let fresh water accumulate in the tank — I dunno maybe 10 – 15 gallons
– Bypass the hot water heater
– Fire up the water pump
– Run all the taps and toilet until they don’t run pink any more
– Shut off the water pump
– Open the drain on the hot water heater, un-bypass it, fire up the water pump again, flush the anti-freeze out, shut off the water pump, re-install the drain plug, fire up the water pump and fill the water heater with fresh water (hot water taps should be open — they’ll start supplying water when the water heater is full).

Should be good to go at this point — I don’t see any reason to dump the gray and black water tanks, although I spoze you could as the last step. They’ll keep until the first time we’re at a dump station, at that point we can dump out the anti-freeze and fresh water that’s sloshing around in there.

Update — some months later (January, 2008)

All right!  It worked!  I just got back from a trip to Florida and can report that the plumbing worked fine after going through the “undo” checklist.

I can also report that this method sorta saved our bacon on the way back.  As we left 85-degree Florida, a huge cold snap rumbled through the Midwest and we realized it was going to be below freezing by the time we finished driving on the first day back (in Georgia!).  So in the mid-afternoon we pulled into an RV park, paid their $20 dumping fee, and did the “winterize” checklist before heading on up into frozen territory.   The nice thing about this approach is that you can do it without any tools, unlike the traditional approach.

So we’re all winterized again (which is good, ’cause the night we got back it hit 15 below) and looking forward to our next trip south.

First RV journey

Marcie and I have been planning to get an RV ever since we rented motorhomes to take Robert and Richard on trips during their spring breaks from school. The original target date was going to be April of next year (when we hit our 25th wedding anniversary) but the sale of haven.com sorta got me fired up about Changing Our Lives so I moved the schedule up a few months.

I’ve been researching RVs forever, so the decision-process was really more of an update than starting from scratch. I’m a big fan of the folks at The RV Consumer Group. They’re complete nut-cases about how unsafe most RVs are and I’m with them — especially after what happened on the way home from picking up our 5th wheel. We had what turned out to be a relatively minor crash when a deer ran in front of us on I-80 just outside of Des Moines. I attribute a lot of that happy outcome to the fact that we were running a rig that the RV Consumer Group folks would rate very high for safety — a relatively small 5th wheel trailer, pulled by a truck that can handle way more load than we’re putting on it.

Had we been running overloaded (the way lots of people do), or in a Class-A motorhome (where everything is in one bus-like vehicle), or if we’d had too little undercarriage protection on the truck (and hosed up the steering) we could have been in a lot of trouble when we hit Bambi at 70 mph. As it was, the deer is quite dead, the truck is in a plain-Jane Chevy dealer’s body shop for not-too-complicated repairs, and nobody got hurt. Can’t complain about that outcome at all, especially since this happened on a really busy freeway and there were lots of cars and semi’s I could have hit. ‘Course, the deer probably would argue with that assessment, but she be dead.

Anyway, on to the fun stuff. Pictures! Lotsa pictures. This first set is the saga of the truck and the RV — starting in Phoenix where we picked up the RV, and ending up in Des Moines yesterday;

Truck! RV!

And here are the classic tourist snapshots of the trip — includes the Grand Canyon and the Black River Canyon.

The Road West

And here are some videos (turn the sound down, it’s just camera noise)

Grand Canyon 1 

Grand Canyon 2

Gunneson Black River Canyon

Continental Divide

Domain selling points

I just got back from the latest Traffic conference. ‘Seems time for another article in the “Domain names” category.

I’ve been pecking away on the problem of selling one (or a few) of my remaining domain names to an end user for the last year or so. Last year I decided to issue an RFP for domain brokerage that went precisely nowhere. I have various theories about that, ranging from me being a dope, to me being ahead of the market, but the upshot was that I decided to make a background hobby out of figuring out how to sell domains to end-users rather than domain investors. I’m not exactly cut of the right cloth to do that kind of thing, but it’s a great hobby.

To that end, I decided to collect all the good reasons that an end-customer might want to buy a domain for their business. I’m a pretty good listener and some of the bestest domainers are now out there with blogs, so I had some awful smart people to listen to while I was building the first-draft of my case.

As my little draft came together, it seemed like a good list to share with the folks at TRAFFIC and Rick Schwartz was kind enough to give me a slot as a member of the Madison Avenue panel. I sure wish I’d been healthy when I was standing in front of the gang, although enough people asked for the slides to make me think it went ok.

Here’s a link to the presentation in PowerPoint format and here’s the same thing in outline format;

Sales

  • Beat competitors to prospects
  • Obtain more qualified leads
  • Increase closing ratio

Marketing

  • Expand into a new market
  • Enhance position in current market
  • Consolidate a fragmented market
  • Reinforce brand (or “reverse brand”)
  • Capture mind-share

Finance

  • Improve revenue and profit
  • Reduce or avoid recurring costs
    • Customer acquisition
    • Branding
    • Advertising
  • Own an asset that will continue to appreciate

Operations

  • Provide a memorable, unchanging address
  • Reach a world-wide audience
  • Improve web traffic, search ranking and ad-placement
  • Leverage online advertising expenditures

Trends

  • Web audience ““ up
  • Online advertising ““ up
  • Importance of web identity ““ up
  • Domain valuations ““ up
  • One-word name availability ““ nil

Opportunities

  • Capture a category ““ broadly or narrowly
  • Stand shoulder to shoulder with much larger companies
  • Use social media to selectively enhance brand
  • “Own a word” in the mind of the prospect ““ and prime your site

As you can see, I’m trying to clump the “solutions to problems” by the type of person in the company. My notion is to write a little something about each of these and use the resulting paragraphs in a book that I would build for each domain. Then, figure out who the 200 best prospects are for the domain, mail them a copy of the book, follow up with phone calls and try to trigger a bidding war between 3-5 interested prospects. I don’t know where the spare time to do all this is going to come from, but that’s the plan.

TenTec Omni VII — a great idea, but not too secure

More ham stuff. Sorry gang. I’ll get off this kick sooner or later, but this is what I’m obsessing about these days.

Today’s rant is about a radio that I’d love to buy, but which has some pretty big security holes for a device that’s intended to be hung out on the public Internet.

I’ve been enchanted with the idea of the TenTec Omni VII and was very close to buying one, mostly because of how easy it is to put it on the Internet and it’s “software controlled” architecture. I still think it’s a neat radio but pretty bugged by the complacency implicit in it’s current design, so I dunno whether this is really the radio for me.

Here’s the scoop. I’ll lay it out in three different “cases” — Case One where you’re using the Omni VII on your own local network and not punching a hole in your firewall, Case Two where you’re letting people get at the Omni VII from the Internet (the usual config I would think — certainly the one I want to use) and Case Three which is a kludge where you insert a PC between your firewall and the Tentec.

Case One

OmniVIISec3


Omni VII is configured with an “inside the firewall” IP address (eg 192.168.1.5) and an arbitrary port (eg 5432). Firewall is configured to block traffic from the Internet (the usual configuration of a home firewall). The PC accesses the radio on the chosen port, entirely within the local network.

Implications

  • The radio isn’t visible from the Internet (unless you’re being attacked by a really heavy-duty hacker)
  • The radio’s 2-byte (0-65k, all numbers, I think pretty weak) password is not a big issue, as the machine is only being accessed from inside the local network.
  • There is no user-account “ring-fencing” on the radio, so if an intruder (say a child or guest) gets to the radio on the local network, they have complete control, but presumably you can stop them fairly easily by hitting them with a stick or something.
  • Denial of service attacks can only be directed to the firewall, not the radio so even if you’re getting pounded on you’re probably ok.

Evaluation

  • This is pretty secure. You’re running a server (the radio), but you’re not exposing it to the Internet, so fishing expeditions to find the radio will fail (with all the caveats about nothing being totally secure).
  • It’s also not too useful — you can only get to the radio from your local network, so the whole point of an Internet-accessed remote-controlled radio is lost.

Case Two

OmniVIISec1

Setup

  • Omni VII is configured with a non-routable “inside the firewall” IP address (eg 192.168.1.3) and an arbitrary port (eg 5432). Firewall is configured to address-translate and forward traffic from a public-routable IP address to that address/port combination.

Implications

  • The Omni VII is a public server that is visible to anybody on the Internet (with all the attendant security concerns that any public server has)
  • The IP-address/port/password combination is visible for port-scanning attacks (the radio does not respond to a query unless all three of those are correct, however)
  • There is no user-account “ring-fencing”, so once the address/port/password have been cracked, all capabilities of the radio (receive, transmit, reconfiguration) are available to the intruder ““ with profound implications for the radio’s license-holder, who will be held accountable for any malicious behavior.
  • The radio is visible for denial-of-service attacks without the need to hack into the radio

Evaluation

  • The radio is available to anybody on the Internet, there’s no capability to distinguish between allowed (white-listed) IP addresses and all others
  • The radio has no limit on the number of failed logon attempts, nor is there any time-delay between attempts, so address/port/password combinations can be presented very quickly
  • The radio doesn’t log failed logon attempts, nor does it have notification capability to alert the owner that their server (radio) is being attacked
  • The full capabilities of the radio are available once it’s been penetrated, there’s no “account” structure, nor is there the concept of granting user-rights in the software
  • The software to access (and exploit) the capabilities of the radio is publicly available on the Internet
  • The source-code of the software is publicly available on the Internet, so a cracker can read the code to understand the handshaking protocol

Rebuttal

I spoke with folks at TenTec about this. Here are some of the concepts they presented to calm me down.

  • The radio doesn’t respond unless you get the address/port/password combination correct which makes it pretty stealthy
  • That address/port/password combination represents a lot of combinations for a hacker to try

Those are Good Things. But that defense presumes that the cracker doesn’t have a lot of brute force available for their attack — which makes me nervous in this day of zombie-pools that number as high as 1.5 million computers (here’s an article about that).

The kids who develop and trade hacking scripts could easily develop a module that looks for these radios and simply add it to the port-scanning scripts that they’re already running. Screaming through 65000 possible passwords per address/port sounds a little extreme, but suppose the Bad Guys are terrorists instead of script-kiddies and they’re looking for these radios as part of a broader attack. Combining the script with a zombie-net of a few hundred thousand computers could flush out a lot of radios.

Suggested Changes

The bad news is that this radio is pretty wide open. The good news is that some relatively simple changes could make it a lot better.

  • Increase the size of the password from its current two-byte (65k possibilities) size. Tacking on another byte would get you 16 million possibilities, two more bytes would get you to up to almost 5 billion. A couple bytes of storage seems like cheap insurance.
  • Introduce the concept of authentication failure — after N attempts the radio won’t accept any more attempts for some period of time, after M cycles of that the radio locks out all external log-in attempts until it has been reset from the front panel.
  • Introduce the concept of “accounts” so that the radio’s owner could grant varying levels of authority to different users (while at the same time adding another layer of cracking difficulty). I’d like to see at least 4 levels of access;
    • “Eavesdropping” — for those folks that you just want to let listen to whatever the radio is doing, but not grant any control
    • “Receive only” — for folks who you’d like to grant SWL rights
    • “Transceive” — for hams who can use the radio to transmit and receive
    • “Administrator” — for super-users who can also reconfigure the radio
  • IP-address white-listing and blacklisting as a way to screen out known black-hats and grant rights to your club or friends
  • Some kind of security logging and alert capability, so that if you’re getting pounded by a black hat you can figure out what’s going on.

“Why all this crud?? After all, this is just a radio for crying out loud” you ask. Well, it’s not just a radio any more. It’s a server, on the Internet — a place filled with great folks and other folks who aren’t so great. Since we’re responsible for what our stations do, I’d like to see some tools to help us protect those resources from being attacked.

Here’s one solution, if TenTec leaves the radio the way it is…

Case Three

OmniVIISec2

Setup

Omni VII is configured with an “inside the firewall” IP address (eg 192.168.1.3) and an arbitrary port (eg 5432). Firewall is configured to address-translate and forward traffic from a public-routable IP address to a PC running remote-access software. The PC in turn accesses the radio on the chosen port.

Implications

  • The Omni VII is no longer directly visible to the Internet, the PC is
  • The “signature” of the radio is no longer visible, so intruders won’t be able to find a radio just by port/password scanning, only the PC (which has a firewall, logging and account-structures in addition to passwords)
  • The 2-byte password is now masked behind the PC’s much stronger username/password authentication, plus any authentication provided by the remote-access software — thus adding two layers of much stronger authentication
  • There is still no user-account “ring-fencing” on the radio, so if an intruder gets to the radio they still have complete control
  • The radio is no longer visible for denial-of-service attacks but the PC is
  • The “connect this radio directly to the Internet” feature is lost, since this approach requires a PC

That last sentence is a killer. As I said at the top of this post, the simplicity of dropping this radio right on the ‘net without an intervening PC is one of the two things that drew me to this radio in the first place. Putting a PC in the chain makes me sad — but I’m really uncomfortable just hanging this device out there on the big bad Internet with the sketchy security that’s on it right now.

Marcie says it’s time for a walk so I’ll stop obsessing about this and go get some fresh air on this beautiful spring day.

I’ll give the TenTec folks a heads up and invite them to comment. You’re invited to comment as well.

UPDATE:

Some months have passed.  I wound up buying a Kenwood TS-2000 and marrying it up with TRX-Manager in the “Case Three” configuration up above.  I’m really close to testing the over-the-Internet configuration.

But I realized that I need to be able to dump the radio if the computer or software locks up.  Otherwise I could envision the following (bad) scenario…  I’m logged on to the radio.  I key the mic while it’s keyed the computer or software crashes.  Now the radio is keyed on and I can’t get to it to key it off.

The solution to this problem (remote-controlled power switch) is also a solution to the security problem, hence the update to this post.  Putting the TenTec on one of these switches would make me a lot more comfortable with Case Two because, unlike the TenTec, the switches have more robust username/password security built in.  In that configuration, one could power up the radio when it is needed and leave it powered off the rest of the time.  And, if anybody ever captured the radio, you could power it off.

Here are a couple links to switches that I’m looking at;

Synaccess NP-02 

DataProbe iBoot 

Right now, I’m leaning toward the (geekier, cheaper) Synaccess…

Got my vanity call-sign — KZ0C

Another big milestone today in the Ham Radio saga. The FCC granted my request for a vanity call sign and assigned KZ0C to me. KZ… because it was available. 0C … because i can transmogrify that into OC, which in turn is my last-name initials. A darn nifty call — 4 letters, easy for me to remember, the domain was available, etc.

Getting call letters for radio stations is what led me into domain-names, which have been a really interesting ride over the years. So this vanity-call nonsense sorta fits into a long-term thread in my life. I was assigned a set of call letters when I got my license a few weeks ago (AC0GY) but I never told anybody about that call because I knew I was going to go for a vanity call as soon as I could and didn’t want to confuse people. Now I can go public! Yippee.

Of course I’ve run out and gotten the domain — www.kz0c.com points at www.haven.com right now, but I’ll probably split the ham radio stuff off to the KZ0C site over time.

I’ve found some sites that will charge a little fee to do the vanity call-sign application for you, but I thought I’d just list the steps here in case you want to do it yourself. I didn’t think it was too bad.

Step 1 — go hunting for a good call-sign

There are two places I looked when I was hunting for my vanity call sign. The first one I found was Amateur-Radio.org vanity call letter page where they list all the active 4 and 5 letter calls. They don’t list 6-letter calls ’cause there are way too many. They also have a lot of useful tips and tricks on that page that I found really helpful in completing the application. Since I wanted a call with “0C” in it, I used the search-text function in my web browser to find calls with “0b” (just before) and “0d” (just after) to see if there were any gaps in the list that implied my “0C” call might be available. Found me a bunch that way.

Next I came across the RadioQTH vanity call-letter page . This one is really handy because it lists all the 4 and 5-letter calls that are available. See that grid on the left side of the page called “Available Calls Sorted By”? That’s the place to click — each of the choices will show a different set of available calls. Again, a little browser-based page-searching for the “0C” string got me a refined list. This page is also helpful in that it alerted me to a few calls that I couldn’t get even though they showed up as available on the Amateur-Radio list — mostly because they are in a two-year wait period.

The last place I stopped, to verify my choices, was the FCC callsign lookup page. This is a part of the FCC Universal Licensing System (which you’re gonna have to use to finish this project). I like the fact that the FCC has put this stuff online. The system’s a little clunky, but it gets the job done and it sure beats the huge paper-processing hassles I went through when I filed broadcast FM licenses back when I did community radio stations.

Step 2 — go apply for the call letters

I did this by logging into the FCC’s Universal Licensing system and heading over to their vanity call sign page. I found the process to be pretty much like any online-store type thing. The FCC suggests submitting more than one set of call letters so that if my first choice was taken by the time they review the application (which mine was — my first choice was KQ0c), they can still grant the call. They charge a fee — I recall it being around $25 — which covers the license for 10 years. Compared to domain-names, a bargain!

By the way, there’s a bug in the FCC’s system. When I typed in my choices, the grid was numbered left-to-right then top-to-bottom. But when I looked at the online “reference copy” of the application, the grid was numbered top-to-bottom then left-to-right. But my choices were in the positions that I’d entered them online. Yikes! I called the FCC and the nice person there patted me on the head, said “there there” and assured me that my preference sequence had been preserved. It just shows up wrong in the reference copy of the app.

Step 3 — bite nails and hope for the best

This is a long tradition amongst people who apply for call letters. It used to drive me nuts back in the community radio days. My favorite story was the first set of call letters I applied for in Madison. I was all set to go with WOMB (in the cradle of the revolution, Madison, WI) until wiser heads prevailed. So we settled on WART (which was available). We submitted the application, nail-biting ensued and dang! We missed that one! I called up the station that got it and asked them why on earth they wanted WART??? They came back saying “because we’re an ARTs station!” I came back with “yeah but don’t you see? you’ve got WART!” They were stunned. But they didn’t want to give up the call so we settled for our second-choice which was WORT.

Now days the nail-biting is web-enhanced because now you can watch your application fight its way through the process, and you can watch all those other people go after the same calls you covet. The place to do all this is the RadioQTH vanity call page, except this time you click in the “Filed Applications” grid on the right side of the page. I think their database is several days behind the FCC’s — I’m looking at it right now and it doesn’t reflect that I’ve gotten the KZ0C call yet. It still shows my application as in progress, even though they predicted the day that they estimated the call would appear in the FCC database on the nose.

So here I am — the proud owner of a really neat set of call letters. I’m going to find out everything I can about the previous holder(s) of this call. The person I’ve found so far is James Bohnsack who lived in Waterloo, Iowa. It seems to me that, since I’m not the first person to occupy this little piece of ham-radio real-estate, I need to honor those who’ve been here before me. If any family or friends of Mr. Bohnsack happen across this little blog entry, I’d love to hear from you!

Remote transceiver and antenna

This is an ongoing post that I’m going to use as a scratchpad to document the “put a ham station on top of the ridge” project.

Updated – maps (aerial, topo, elevation)

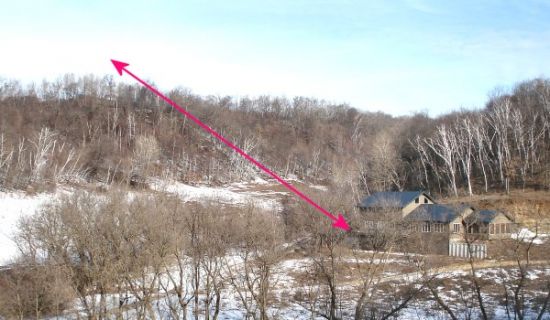
Here’s a picture of “the problem”

House to ridge

The farm is a wonderful place, and the house is in a nifty location. South-facing so it gets lots of sun in the winter, huddled in the valley out of the way of the prevailing north winds, close to the water table so the well isn’t very deep, etc. A great spot for a house. But a lousy spot for a ham-radio antenna. The arrow points to a much better spot for the antenna. The question; how to make that work?

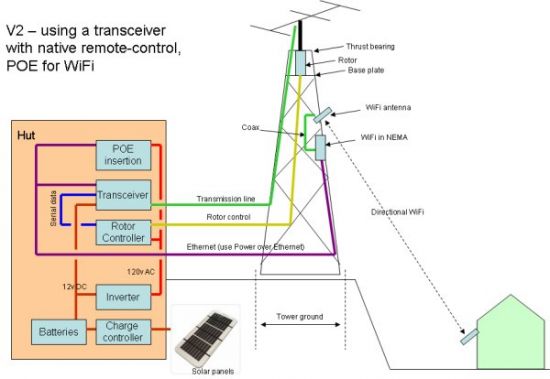
Here’s the latest block diagram of The Plan

Block diagram v1

This’ll change as I get smarter, but it’s a first-try. There are some interesting choices;

– Should there be a PC up there to do the housekeeping on the serial-port, or can I push serial through the transceiver?

I’m going to use a TenTec Omni VII radio, which can push serial out the back — which may or may not work for controlling the antenna rotor. The cool thing about the Omni VII is that it can be directly controlled via Ethernet, which eliminates a lot of fussiness.

– Where should the WiFi access point be?

Right now, I’m leaning towards mounting the AP up near the WiFi antenna, to keep the coax run between the AP and the antenna as short as possible. That means either running AC power up the tower, or using power over Ethernet. I’m not keen on having 120v power on a steel tower that I’ll be climbing around on, so I like POE as the solution. Looks like the distance won’t be a problem — max according to the spec is 100 meters — I’ll only be going about 30.

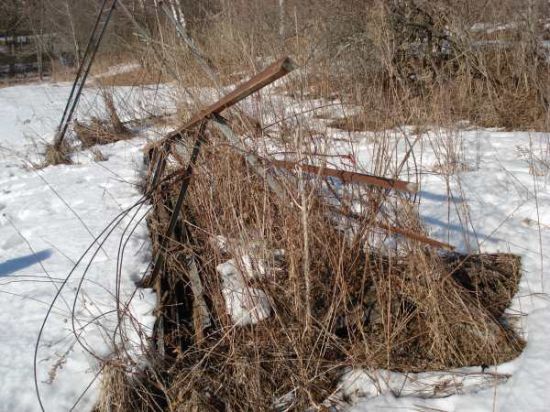
Here’s a picture of the tower

Tower

I used to have a wind turbine mounted on this old water-pumper tower. But the whole shebang came down when we moved and it’s been sitting in the weeds ever since. This will be a great chance to recycle this 50-foot tower.

Update – maps

Did me some fooling around with the mapping program tonight. Here’s the result.

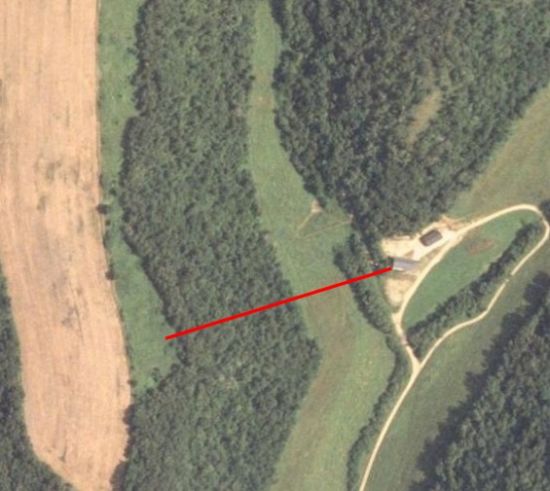
Arial

This is an aerial view — the red line is between the house and the field where the tower could go.

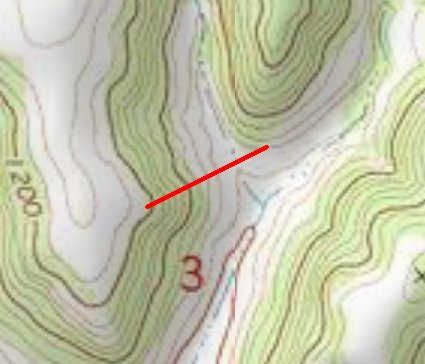
Topo

This is a topographical view…

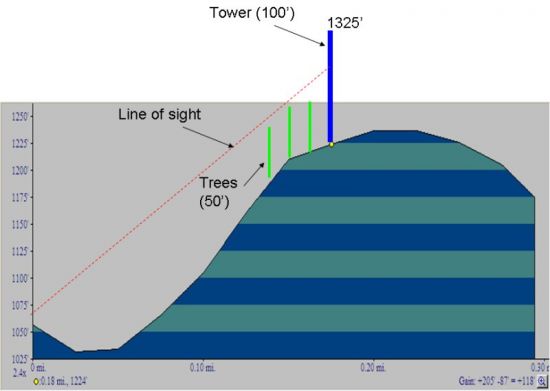
ElevationV2

And this is that same line, but showing distance and elevation. It’s looking like the 50 foot windmill tower would “see” the house, but only with some tree-cutting.  A 100 foot tower would be a cool thing. Then I would be at 1300 feet, which gives me a line of sight shot into Eau Claire and Winona.  I’ve got a line on a really neat 100′ Pirod tower from my friend Don Overbye.

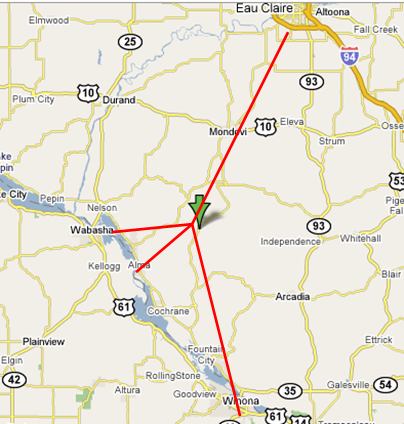
WideAreaMap

Here’s a wide-area map — some interesting possibilities. Winona and Eau Claire are about 25 miles, Alma’s around 14 miles and Wabasha’s about the same. Maybe I could get tied into a repeater network or two… Or get me some high-speed Internet access with a microwave shot…

Repater Map

Here’s one of the great maps from the Milwaukee Area Amateur Society site that shows where I set in relation to the repeaters that they’re tracking.

Ham license

I’ve always wanted to be in the amateur radio type guy, but never had the gumption to pass the Morse-code part of the deal. But the code-requirement went away a couple weeks ago. I was planning to take the test the day after that, but I got skunked by the huge snow storm that rumbled through.

So I took the exam today. Passed all three sections I did, by golly. So today, St Patrick’s Day, 2007, I’m finally in the ham gang. No call-letters yet, but this is the “hello world” post of this amateur Extra type guy.

Since my house (at the farm) is way down in a valley, it’s going to be a while before I actually get on the air. I’ve got a boatload of projects to do — gotta put up an old windmill tower on the top of the hill, figure out antenna-mounting, figure out power and Ethernet up there (might do solar power and long-distance WiFi), figure out remote controlling the transmitter and antenna rotor from down here at the house, etc. The classic ham project. Should keep me entertained for at least 6 months.

Woohoo!

I tried upgrading the laptop to Vista yesterday

Yep, we got sooo much snow that I had to punt off taking the ham-radio license exam yesterday. We wound up getting about 15 inches of snow, and there’s a little more on the way. So that made it a good day to try out Vista on the trusty Thinkpad and see how it worked.

I’ve got a Thinkpad G41, which is a weird beast — it’s a desktop replacement machine, so it’s got a Pentium 4, running around 3 ghz and lotsa memory. But it’s also pretty cheap, which means not much oomph on the video card. Which turned out to be trouble down the line. More about that in a minute.

Anyway, I set out at 9am with a copied image of my hard drive (thanks Nate, that turned out to be a great idea) and fired up the Vista Business install.

The only hard part about the installation was the dreaded “Sonic Studio DLA” problem — Vista scurried around the hard drive before launching the upgrade and said it wouldn’t proceed until I removed that program. Only trouble was, there wasn’t a program by that name to uninstall. Some rummaging in the registry and I realized that IBM had renamed the program “IBM DLA.” They’d also done that with another Sonic product called “RecordNow!” — I pulled both of those programs off the machine and Vista cheered right up.

The rest of the upgrade was easy — it just took a long time. I didn’t time it, but my guess is around 4 hours. The nice thing is that the upgrade is completely unattended so I didn’t have to babysit the machine. At the end Vista popped up, asked me for my password and I was good to go.

I drove around for the rest of the day and just before dinner rolled back to XP Pro by dropping the old drive back into the machine.

There are several reasons why I decided I like XP better on the laptop (which, to be fair, is not listed as a Vista-ready machine on the Lenovo site). The video card is the main hardware reason I rolled back. Vista’s graphics made the video card work so hard that the laptop’s fans were on pretty much all the time (unlike XP where the fan comes on only when the machine is working really hard).

But the real reason I went back to XP is because there really isn’t anything new in Vista. Oh yeah, lots of eye candy, cute new interfaces and navigation. But as one web site says, it really seems like XP with Mac-wannabe clothing on. I’m willing to put up with a lot of pain if software lets me do something cool that I can’t do any other way. But I couldn’t find that cool thing while running Vista.

Meanwhile, of course a lotta stuff broke — I’d have to upgrade a bunch of software that I use a lot (like QuickBooks), peripheral drivers were ok but whining about stuff, the usual bother of an OS upgrade. As I said, I’d do it if it were worth it. But it wasn’t. Sure am glad it was just a drive-swap to return to XP…

Updates…

Hm… Others share my view. Julio’s blog turned me on to this grouchy piece in Forbes. The recommendation? Don’t even think about upgrading an XP box to Vista.

Visualization techniques

This link is running all over the place in blogs that I follow. I’m sticking it in here so I don’t lose track of it.

Periodic table of visualization techniques

Completely nifty set of different ways to visualize information. I got lost in it for about an hour this morning. I sure wish they would put the graphics out in a list so I didn’t have to hover the mouse over them, but that’s just a nit. A great source of new ideas.

Domain-brokerage RFP

I have a gaggle of premium domain names I got a really long time ago. I keep coming up with ideas for them that are either late/lame or too hard for me to do. I’ve decided that the time is right to sell one and, being a structured RFP type guy, I decided to build an RFP to select the broker.

Here’s a list of the domains — I only want to sell one of them, but I’m going to let the brokers choose which one they want to sell so they can sell it into their strongest market segment.

bar.com — social networking, beverage industry, legal services

pub.com — social networking, beverage industry, publishing

grill.com — social networking, consumer products, humor

cafes.com — social networking, food and dining

place.com — travel industry, entertainment, social networking, Internet-destination

shelter.com — social services, social networking, consumer products, industrial products

I’ve prepared a couple of documents. Here’s an introductory letter (in Word format) that describes the process and timing in detail. If you’re thinking about bidding, you fersure want to read that.

There’s also a detailed vendor response document that I will cheerfully email to anybody who’s interested. The reason I’m not posting the response document to the web is to keep track of who’s inquiring so’s to make sure that vendors gets invited to the various events along the way. But if you’re just interested in a copy for any reason, feel free to ping me (everybody: put “RFP response” in the subject to get through the spam filter).

[12 years later: Here’s a link to that response document — it’s still pretty good, although it will make most brokers think you’re crazy for expecting ansers to questions like that.  But hey, they’re still important questions to have answers to.]

Here’s a timeline (see? I am into structure);

1/8/2007 Issue and publicize RFP
1/22/2007 Vendor conference call (at noon, CST)
2/12/2007 Deadline for proposal submission
2/19/2007 Interviews with finalists completed
2/26/2007 Negotiations with finalists completed
3/5/2007 Announce selection

Update:

Well dang. Looks like I threw a party and nobody came. Lots to reflect on in that, but the bottom line is that no brokers proposed. This isn’t the first time this has happened to one of my goofy ideas. It usually means I’m a little ahead of the market. So I’ll go figure out some other approach to this problem… I’ve got some good friends in a related field who bring a lot of marketing and sales savvy to the table — maybe it’s time to roll my own.

Further Update:

Ah! Frank Michlick wrote a piece about this little RFP over at his great DomainEditorial site. Here’s a link to his article about the RFP. Thanks Frank!

Muni WiFi — let’s build a model

I just posted a story over at the St Paul Broadband Committee site about my belief that a lot of the municipal WiFi networks don’t seem to be grounded in financial reality.

Here’s a link to the article and here’s a link to the muni-WiFi financial model I built to go with it.

Here’s the deal — let’s get these models out of the hands of the VooDoo consulting expert type people and into the hands of the people. “Open source financial modeling” if you will. Let’s beat on this model — or write a new one if this one is hopeless — and get to the point where we ALL understand the economics that underpin these projects.

That way, we can either rejoice in bridging the digital divide, solving the problems of the world and putting a chicken in every pot (as advocates claim) or we can avoid the mess that comes with yet another technology project that over-promises and under-delivers.

What say you? Let’s have at it.

Get a customer service human being – gethuman.com

Sure, they’ve been around forever. Sure, most of you probably already know about this site. But just in case you don’t, here’s a pointer to GetHuman.com — a great site if you’re trying to get to a human-being customer-service type person.

Marcie was trying to find the path through Northwest Airline’s patented “Voice Prompts From Hell” system to book a seat for me on an existing reservation. She finally gave up. I remembered reading about GetHuman somewhere, Googled it, looked up NWA and tried it out. Tarnation! Worked perfectly.

I’m sold. It’s even got the incredibly-secret path to Amazon customer-service reps!